


Are you tired of wasting diamonds and iron on creating hoes? Are you looking for a fun way to farm melons? Or do you simply want to show off to your friends? This tutorial will go over how to make a jaw-dropping semiautomatic melon farm. Not only will you be the talk of the server, but you'll have infinite melons for life!
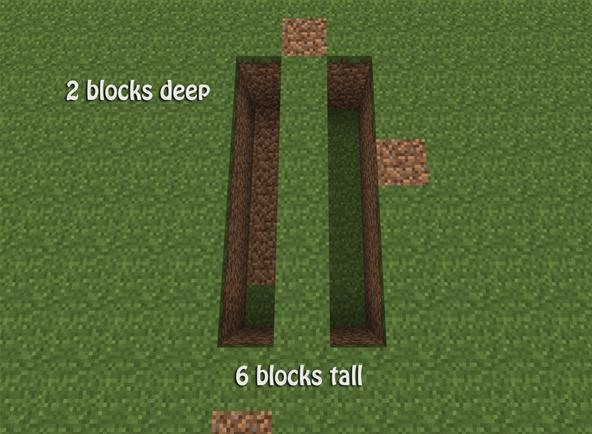
Step 1 Layout
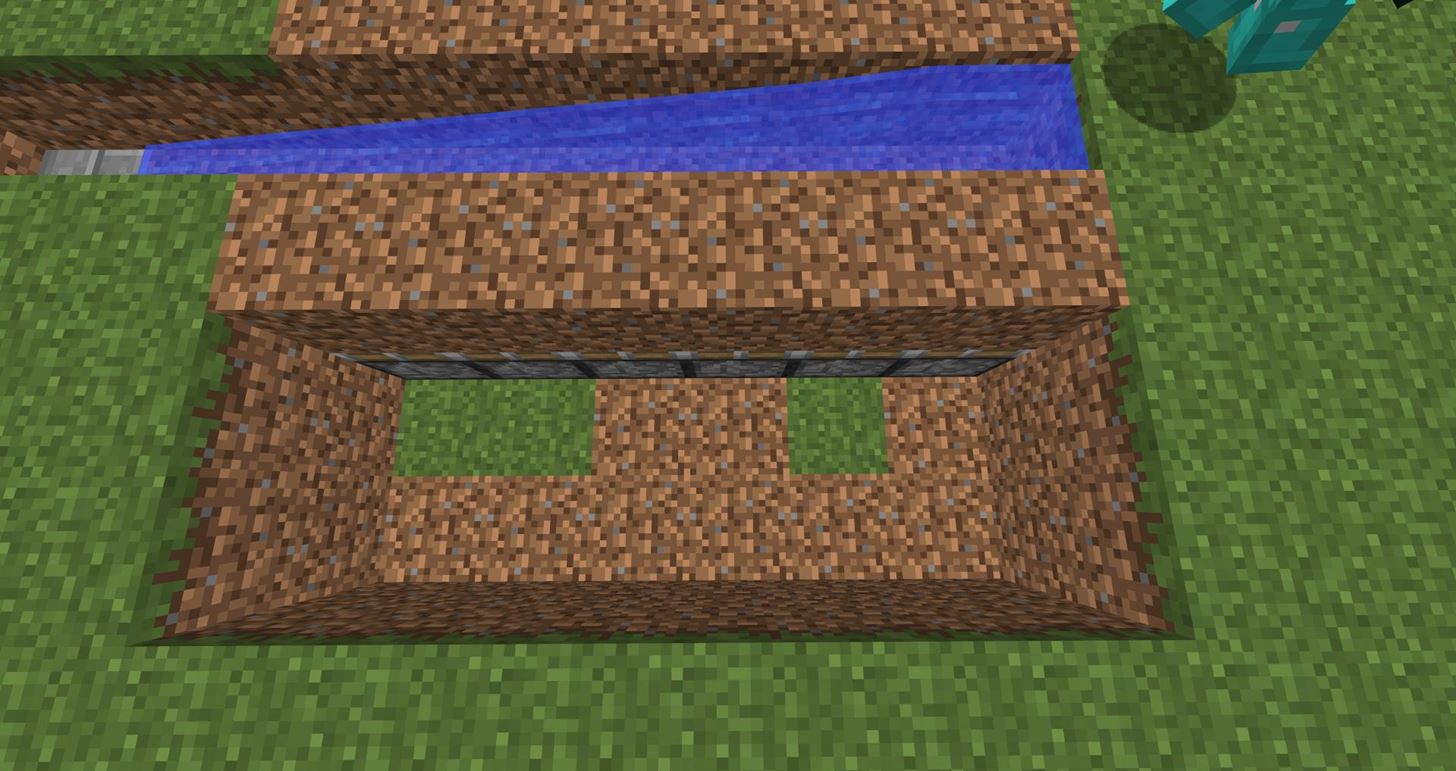
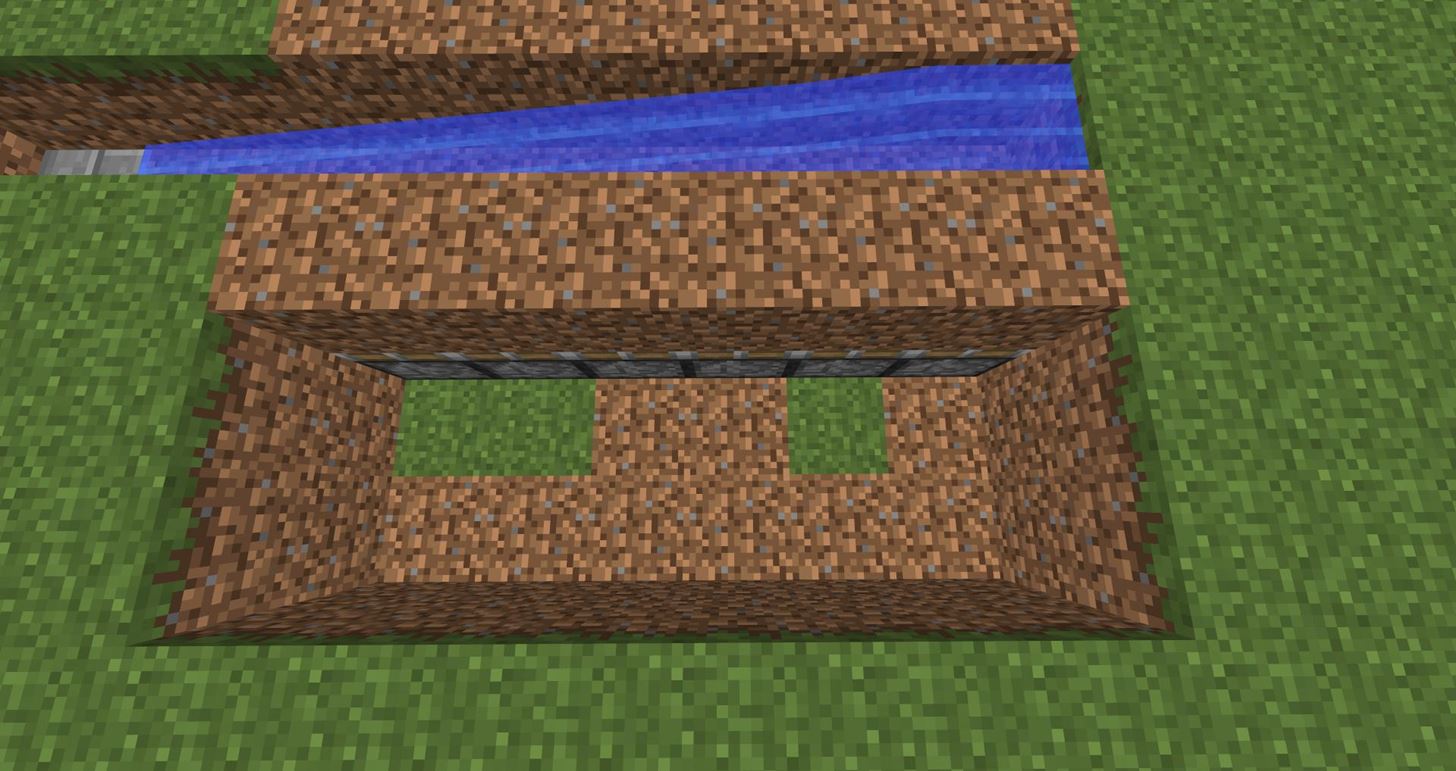
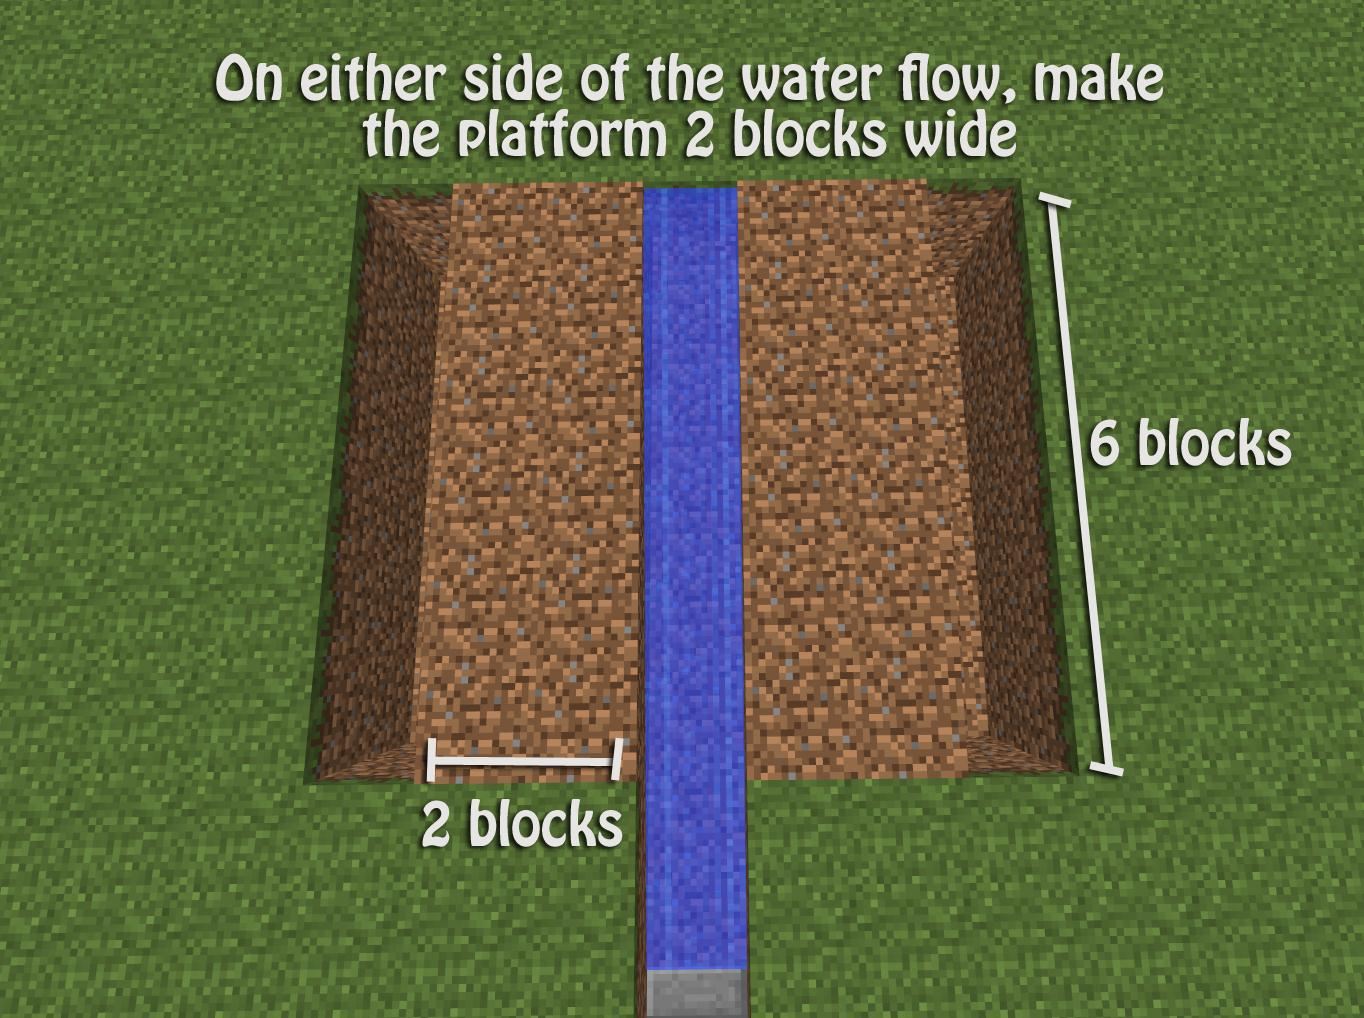
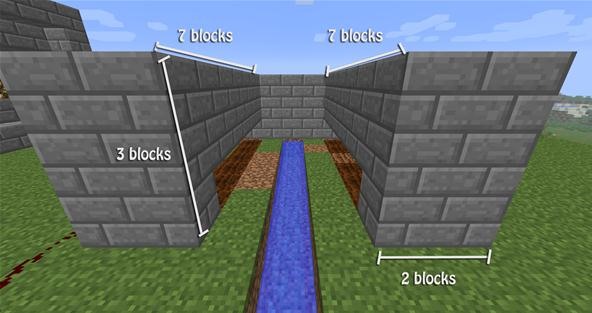
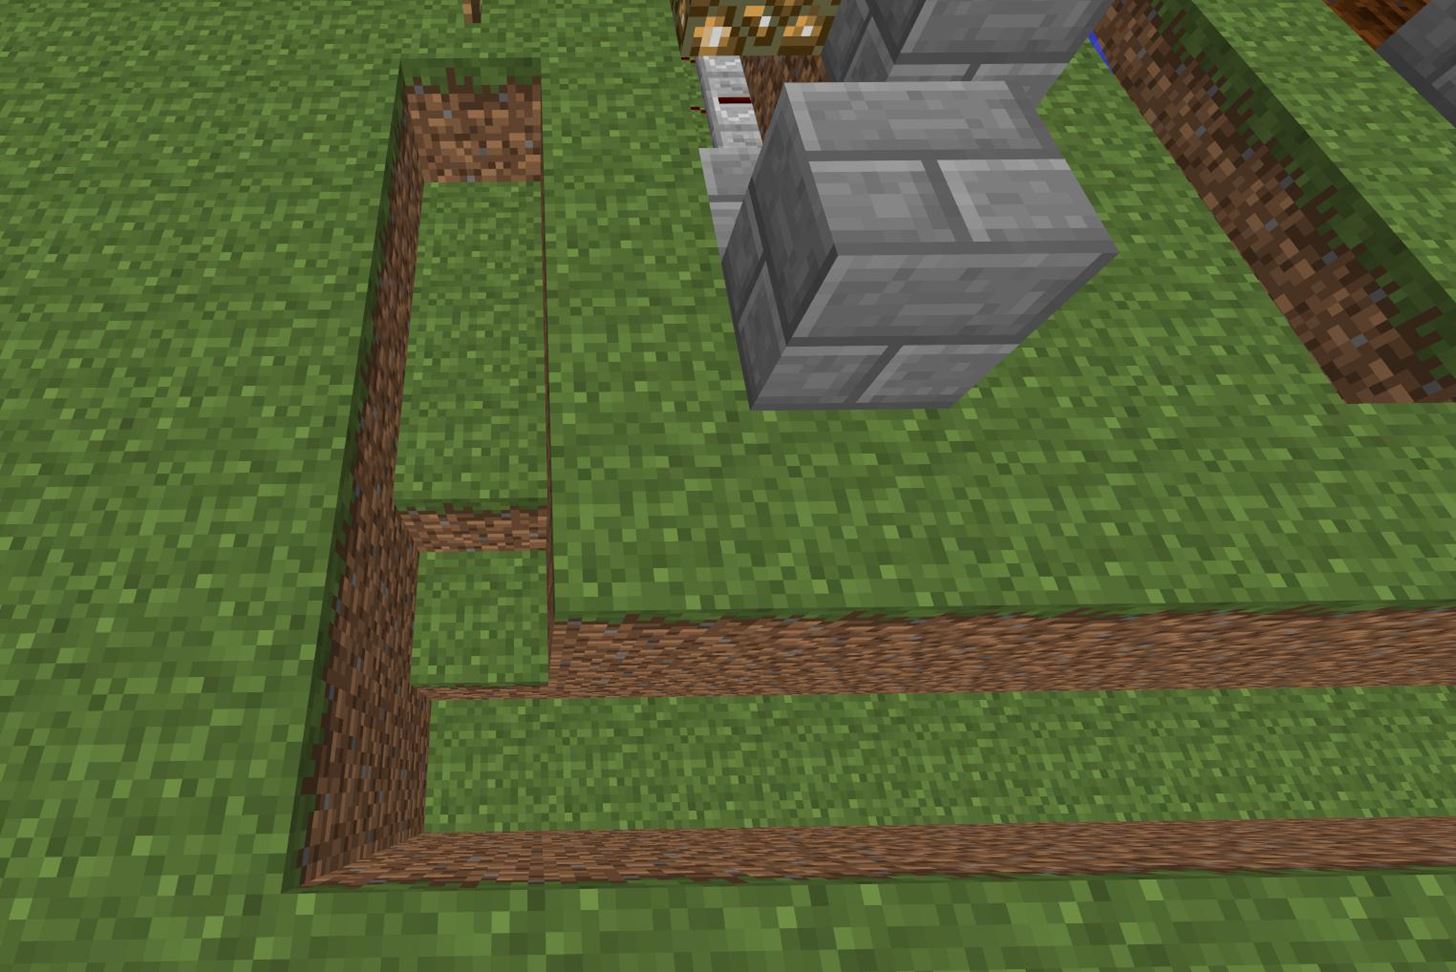
Begin by digging out a little trench. This trench will be 6 blocks long and 2 blocks deep. The center will remain of the trench will remain for now!
Step 2 Sticky Pistons
Using 12 total sticky pistons, place them at the bottom level on each side of the trench. The should be facing upwards!

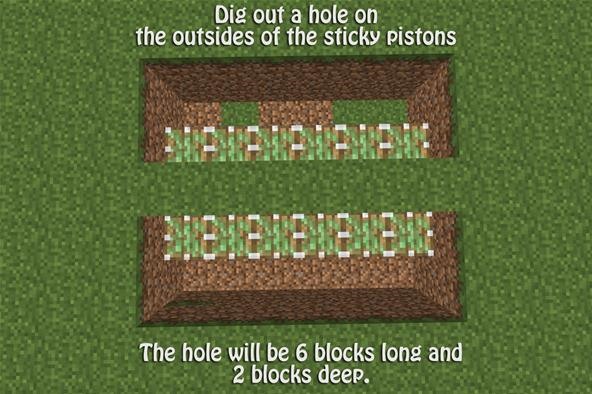
Step 3 Dig
On the outsides of the pistons, dig out another hole on each side that is the same size you created in the first step (6 blocks long, 2 deep).
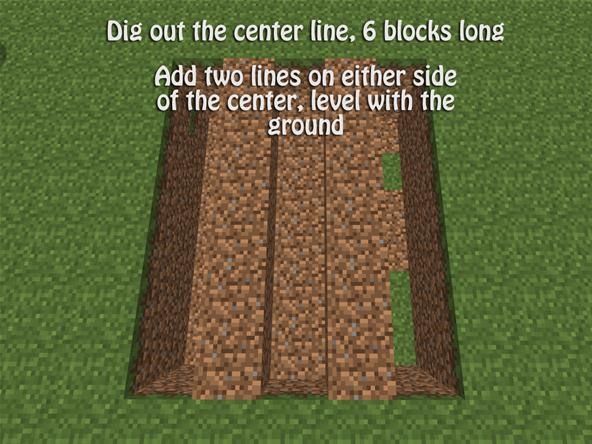
Step 4 Cover
Cover up the sticky pistons with some dirt. Then, dig out the center grass line so it is 6 blocks long and 1 block deep.
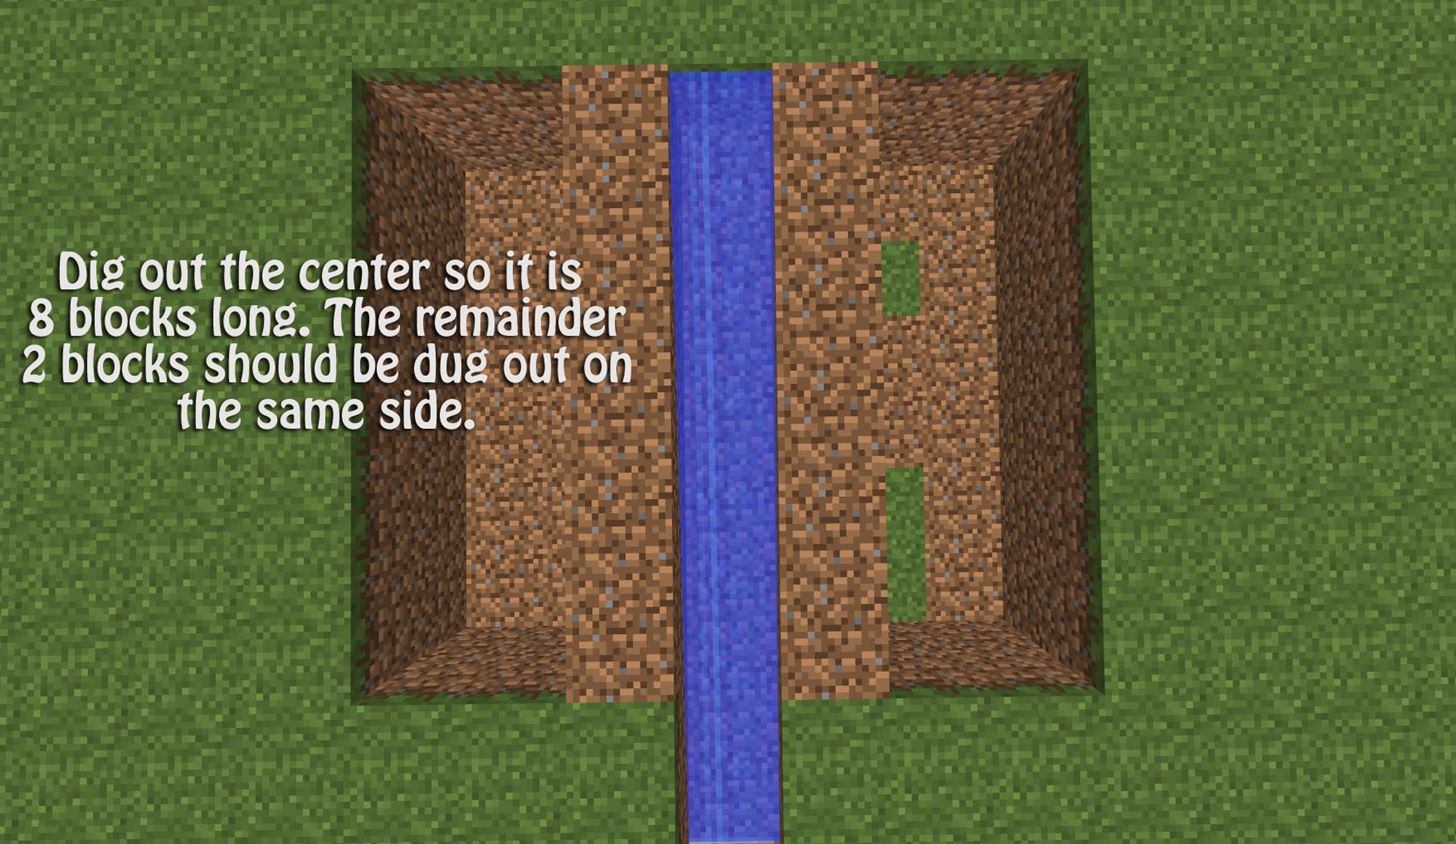
Step 5 Water
Place the water at either side of your center line. Wherever you decide to place your water will be the back of your farm. The water will flow towards the front.
In the front of your farm, at the center water line, dig out 2 additional blocks so the water has more room.
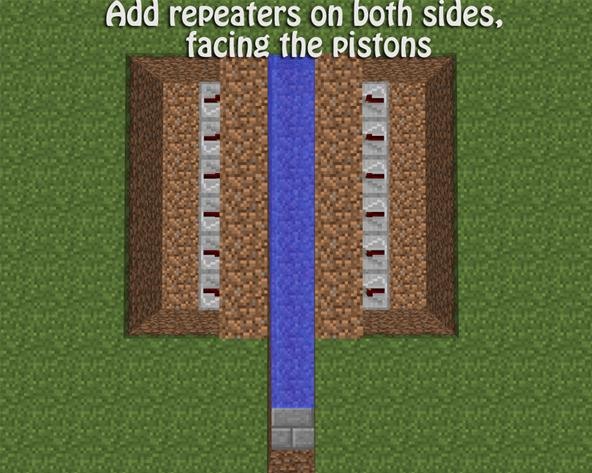
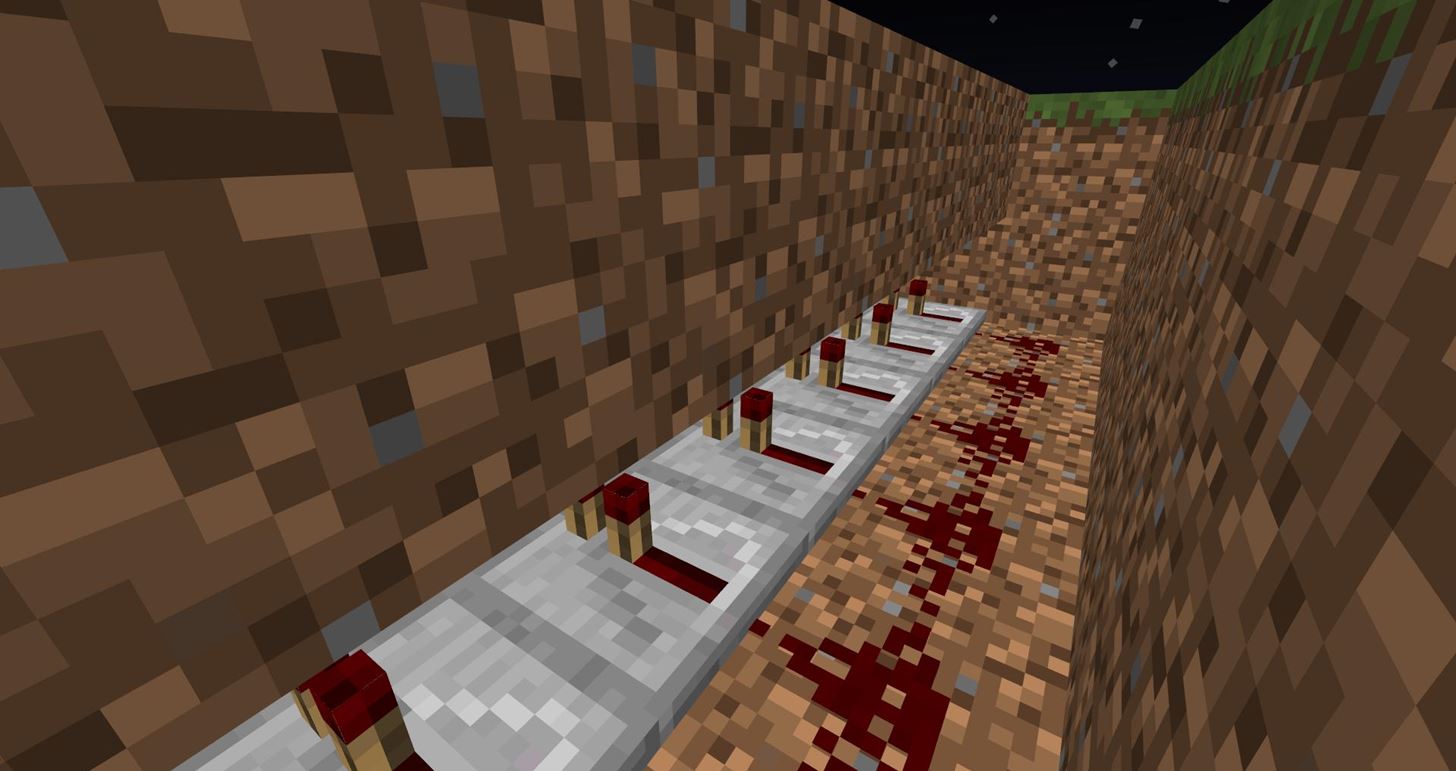
Step 6 Repeaters
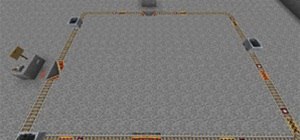
Add repeaters on both sides at the piston level. The repeaters will all be facing the pistons that they are next to. The repeaters do not need a delay of any kind.
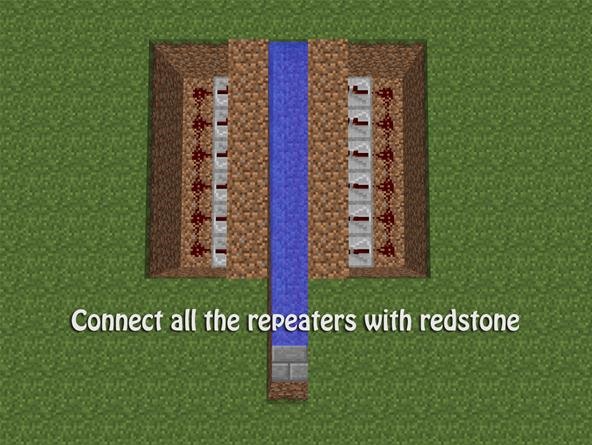
Step 7 Redstone
Connect all the repeaters with redstone!
Step 8 Cover Up
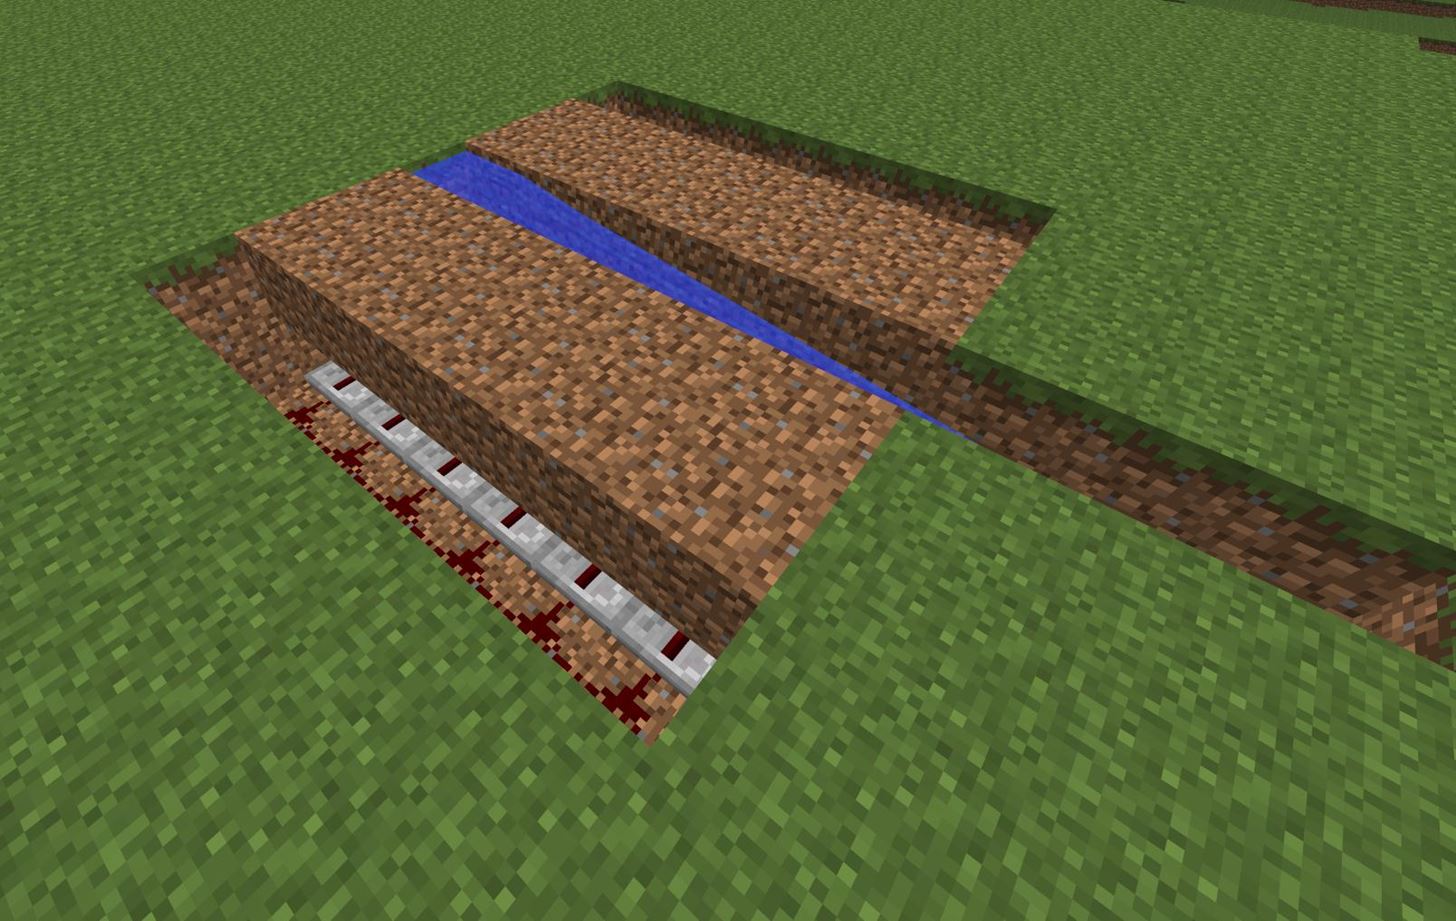
On either side of the water flow, make sure the platform is 2 blocks wide.
Step 9 Connection
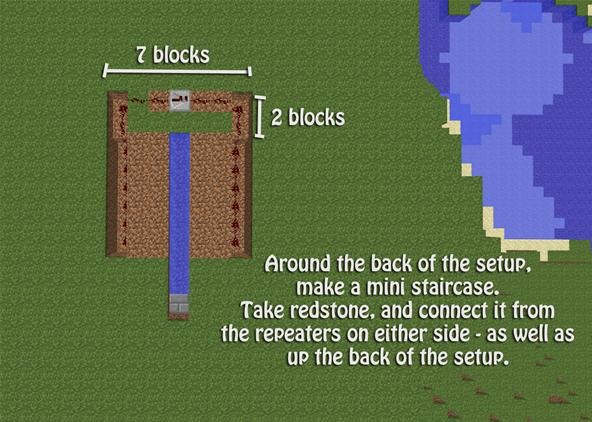
Around the back of the setup, make a mini staircase. The staircase should not interfere with your redstone underground, so be sure to extend the staircase out the back.
The redstone by the pistons are in a 6-long area before this step. On the 7th block (counting towards the back), that should be the first stair.
Take redstone and connect it from the underground area to the back of the setup. Add a repeater at the back center that faces to the right of your farm.
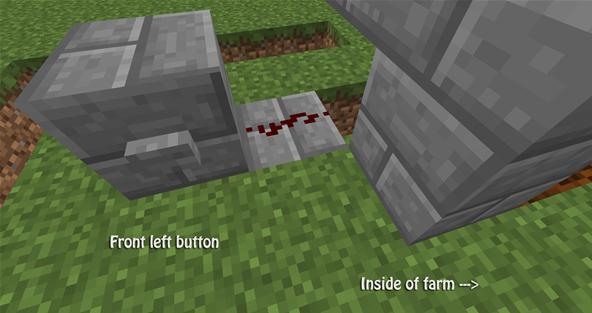
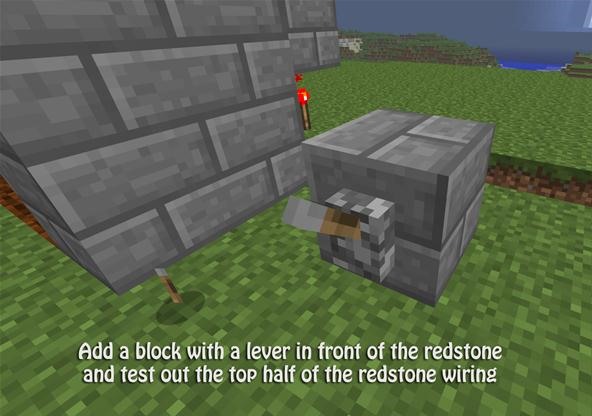
Step 10 Button
At the front left of your farm, at the front of your redstone underground, break the grass/dirt there to make a little step up for the redstone. Place a block 1 block in front of the step, and put a button on that block (anywhere is good for now).
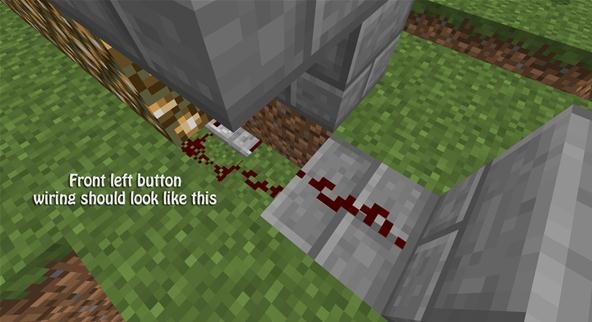
Connect the back of the block to the redstone underground, and test out your button!
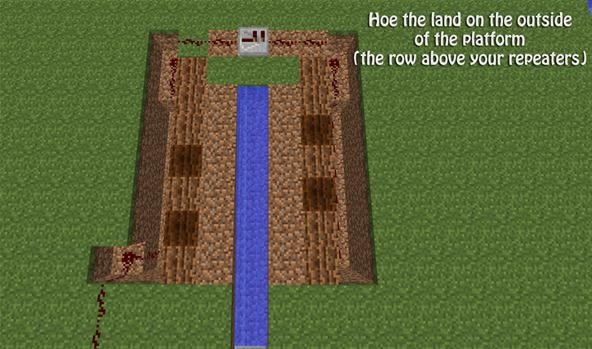
Step 11 Hoe the Land
Hoe the land that is on the outside of the platform near your water. You will only need to hoe 6 blocks on each side.
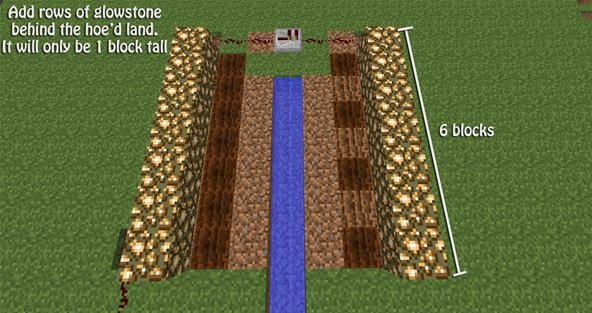
Step 12 Light Source
Add rows of glowstone behind the land that you just hoed. The glowstone should be 6 blocks long and only 1 block tall.
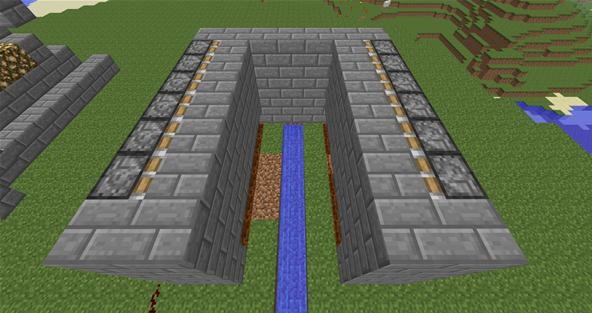
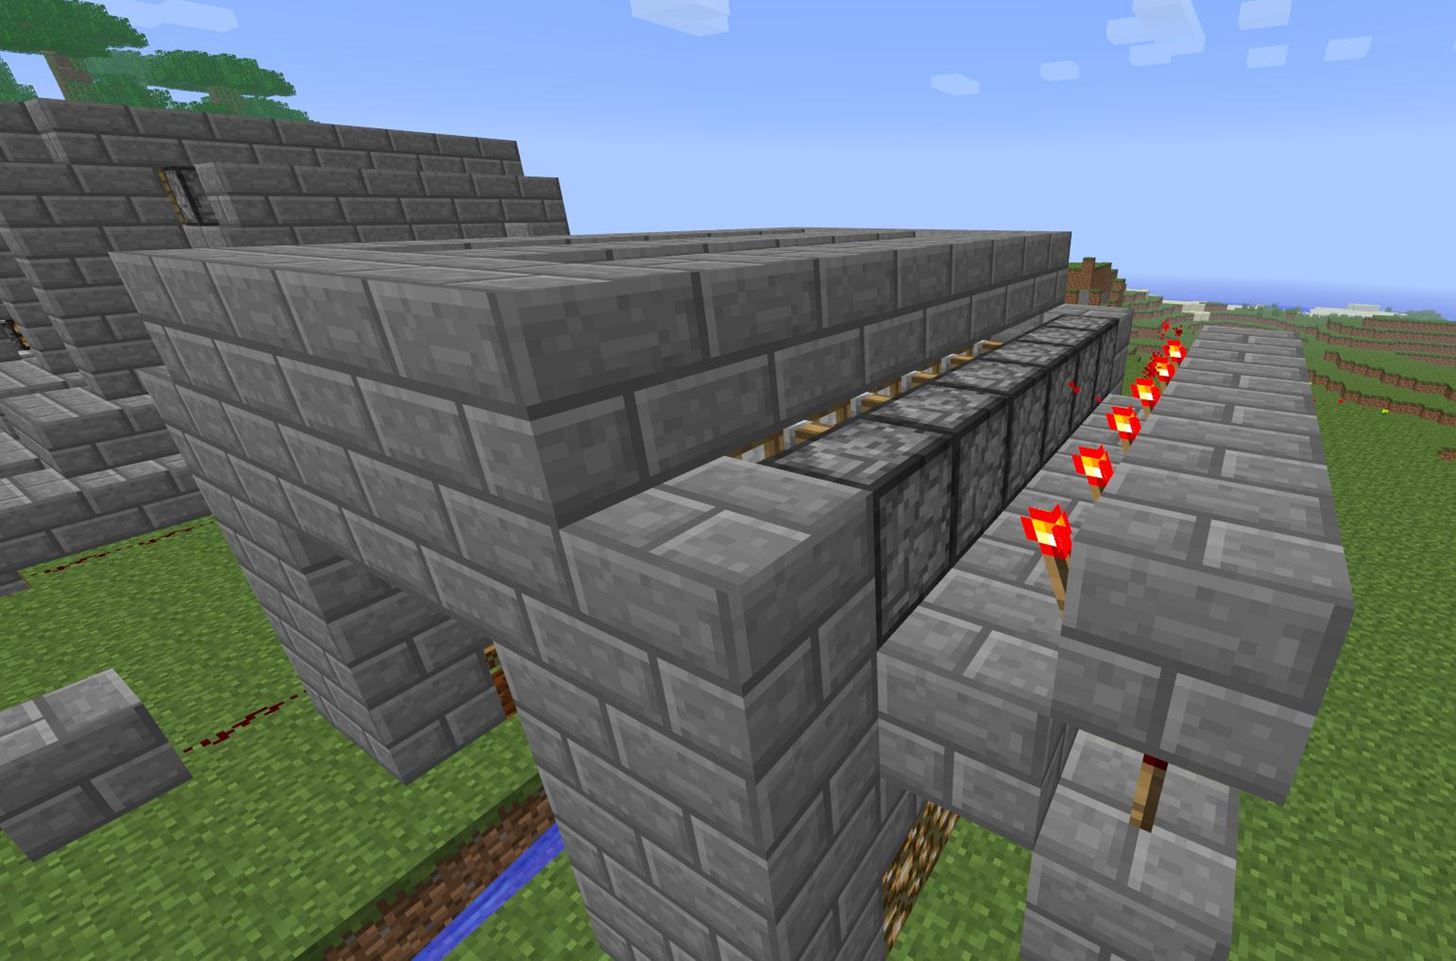
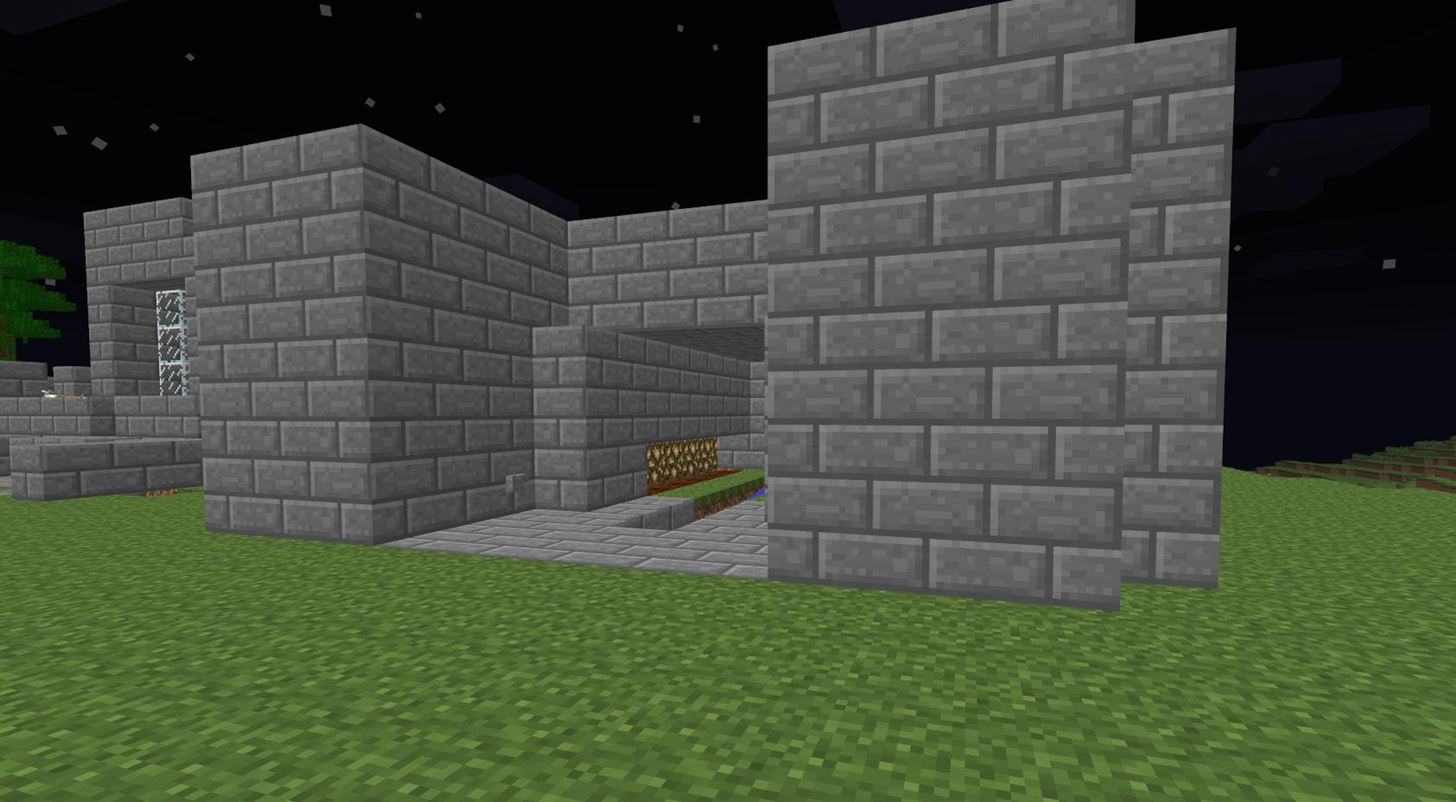
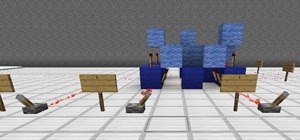
Step 13 More Cover Up
Start the major cover up process. Pick any block of your choice (I used stone brick) and follow the guidelines in the images below. Begin by placing your building material directly on top of the glowstone. Create a back wall directly behind your water source. This wall will only be 1 thick and 7 blocks long.
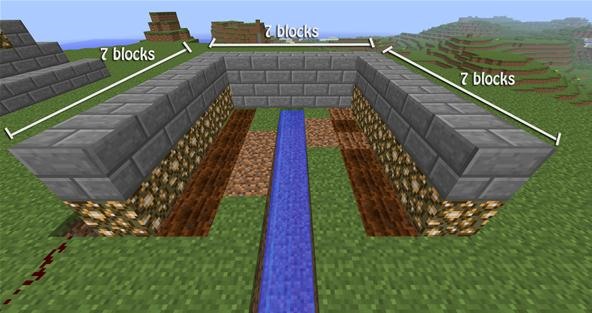
On the sides, you will want to add another layer of blocks over the hoed land.
Add another row on each side (on the inside layer), and build up the back wall so it is 3 blocks tall.
The front two sides will be 2 blocks horizontally, 3 blocks vertically.
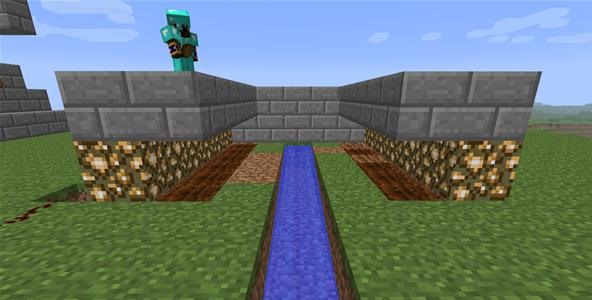
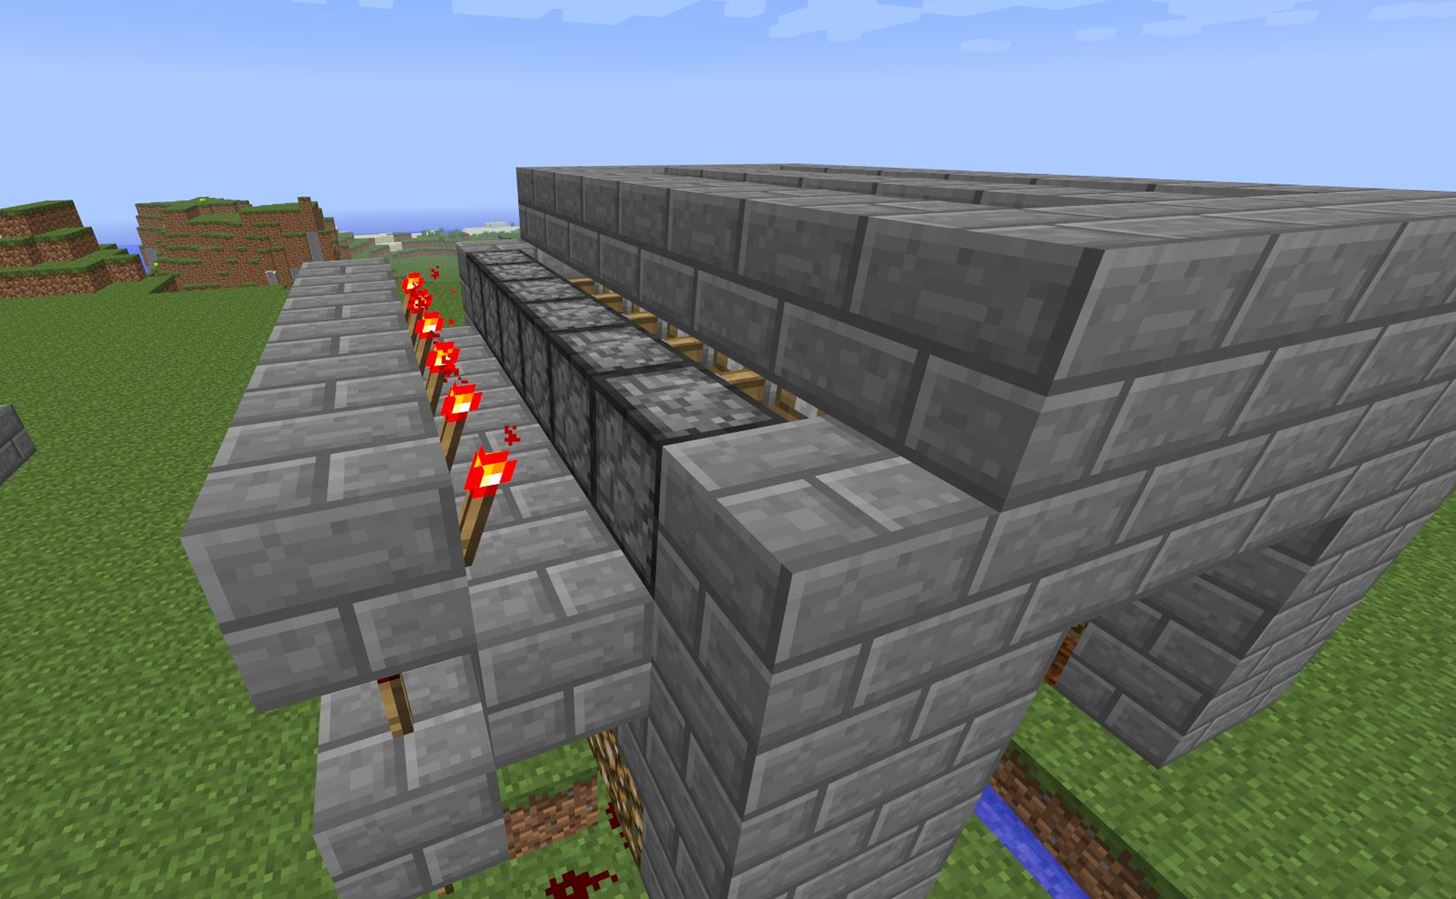
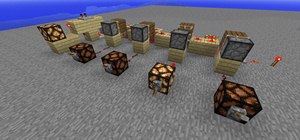
Step 14 More Sticky Pistons
Add sticky pistons (6 on each side) to the outer edges. The sticky pistons should start being placed directly in front of the back wall. Add another layer to the back wall, so that it is now 4 blocks tall.
Finish off this part by adding 2 total blocks (1 on each side) at the front of the sticky pistons.

Cover up the front of your sticky pistons with your choice of building material.
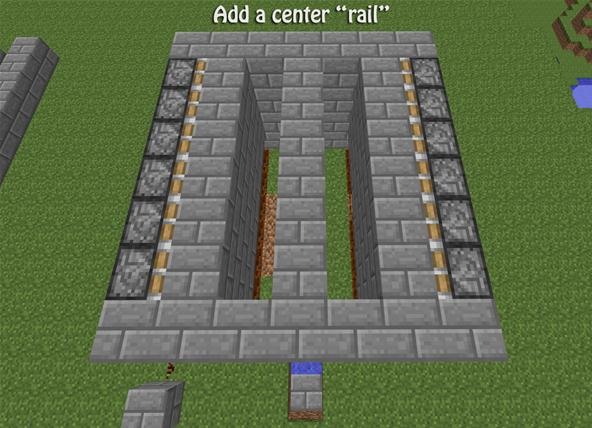
In the center on the top of your farm, directly above your water line, add a 6 long line. Connect the two front corners with blocks as well.
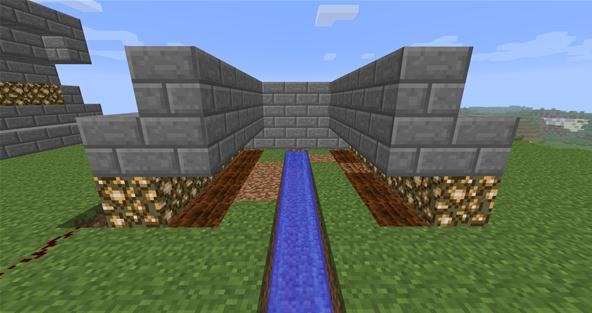
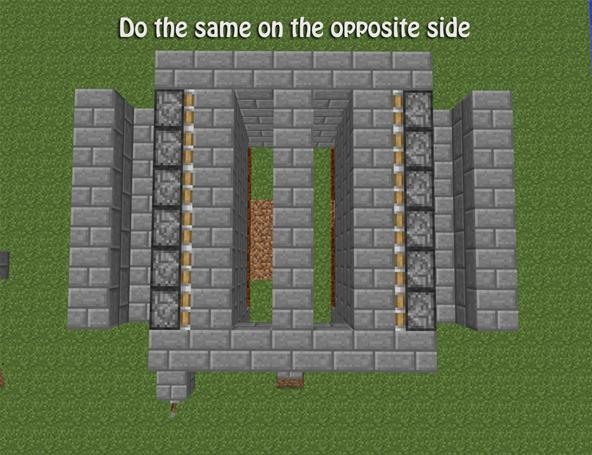
Step 15 Beginning the Inversion Process
Add a platform 6 blocks long and 1 block tall directly behind the sticky pistons at the top of your farm. Add a second platform behind the first platform, but 1 block up, making almost a mini staircase.
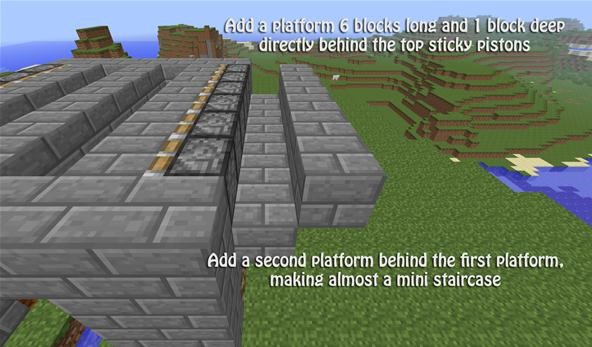
Do this for both sides!
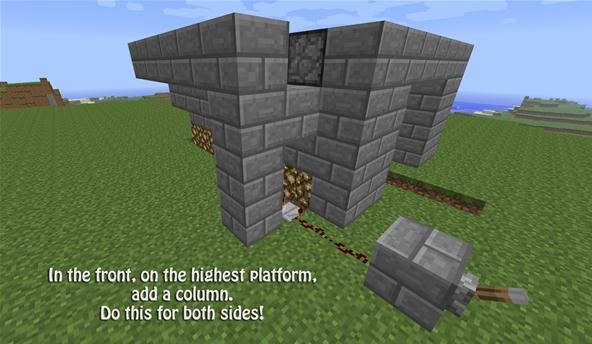
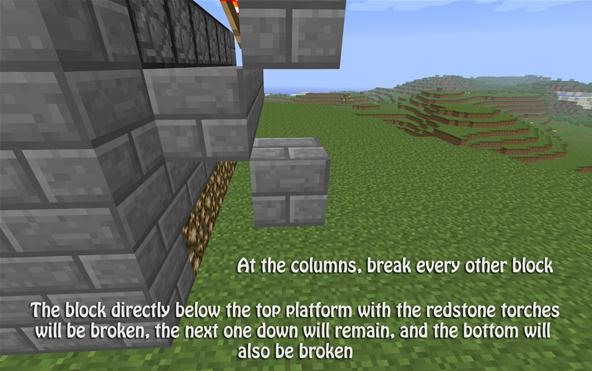
Step 16 Columns
Add columns at the front left and front right of your farm. The columns will attach to the highest platform (the platform directly behind and 1 block away from the back of the sticky pistons).
The columns should touch the ground.
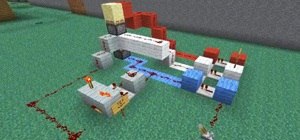
Step 17 Redstone Torches
On the inside of the blocks behind the sticky pistons, add redstone torches. The redstone torches should be attached to the inside of the blocks, rather than resting on the ground.
These redstone torches will activate all your sticky pistons.
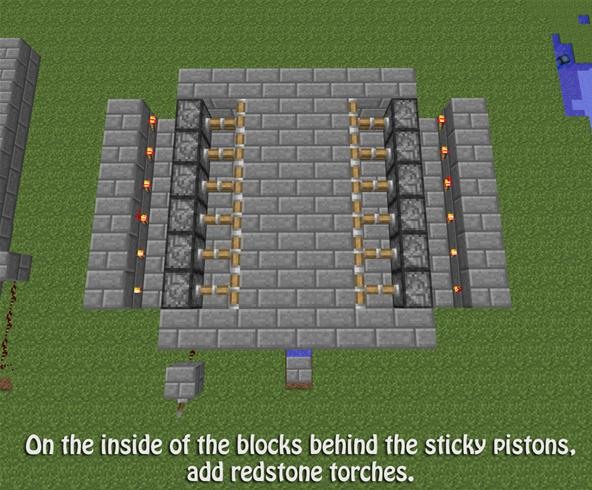
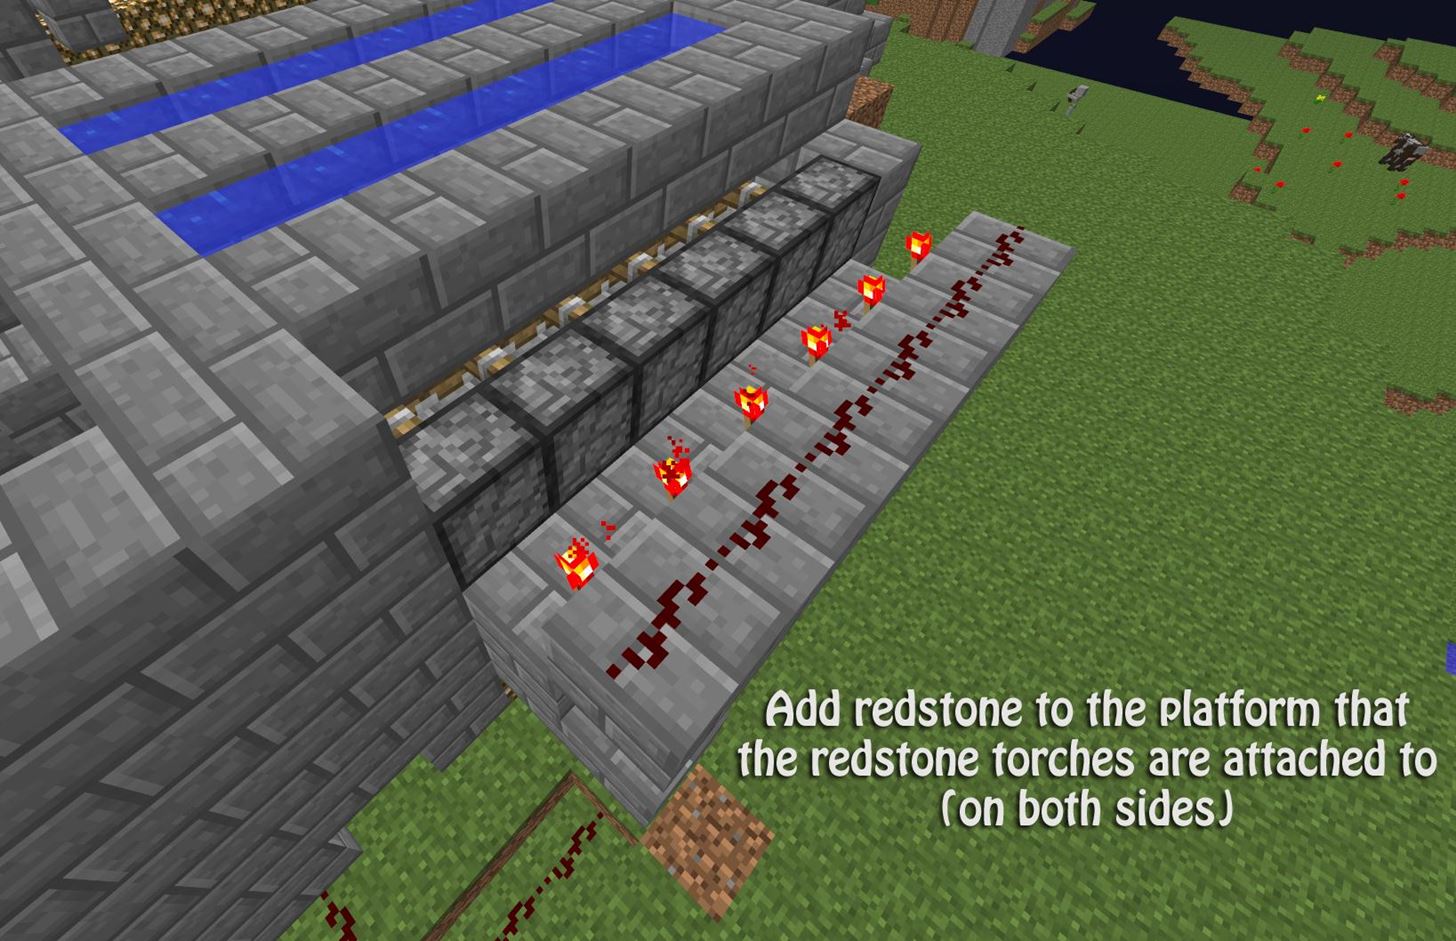
Add redstone dust (6 on each side) to the platform that the redstone torches are attached to (on both sides). This step will ensure that all of our sticky pistons are connected to each other.

Step 18 Back to Inverting...
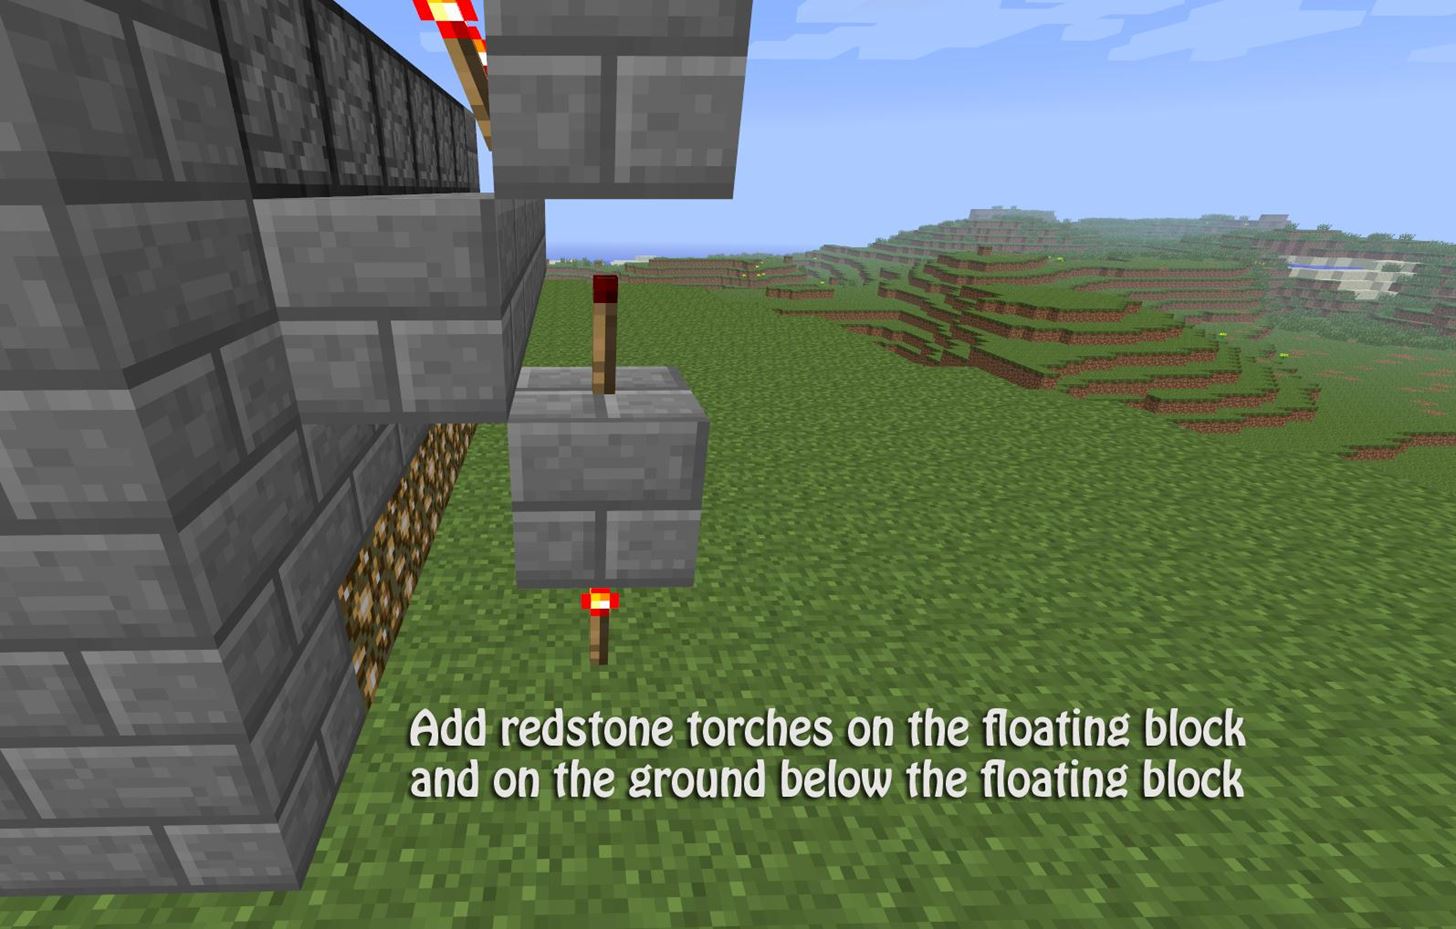
At the columns, break every other block. The block directly below the top platform with the redstone torch will be broken. The next one down will remain in place, and the bottom block will also be broken (the block on the ground).
Add 2 redstone torches on each side of your farm. The first redstone torch will be placed on the floating block, and the second will be placed directly below that on the ground. Again, do this for both sides.
You will notice the top left sticky pistons will open and close, then remain open when you place the last torch. We need our sticky pistons to be in the "on" position on default. This will make sure our water doesn't get out when we aren't ready for it.
Step 19 Water Trench
On the top of your farm, add a water trench. The blocks for the trench will be placed directly in front of, and up 1 block from the sticky pistons. The center will also be built up 1 block on the whole line.
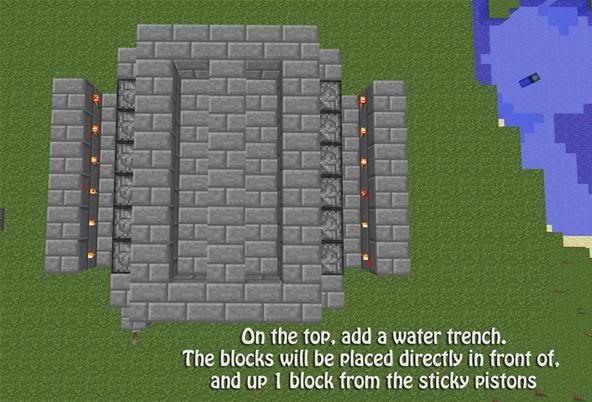
You should now have two separate areas where water can be stored safely without seeping through the bottom or sides.
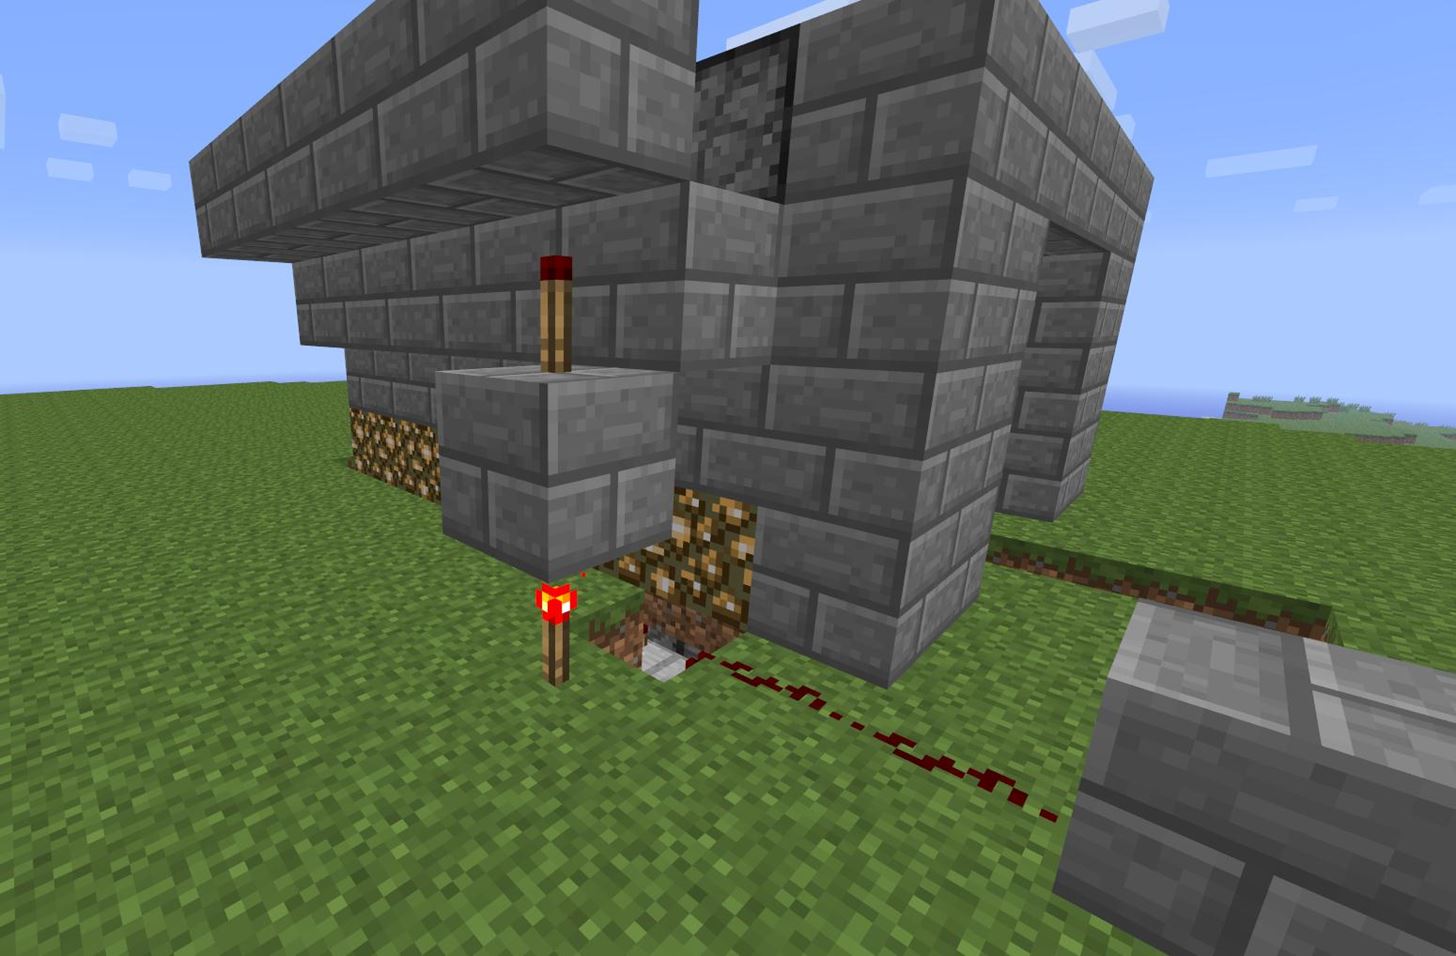
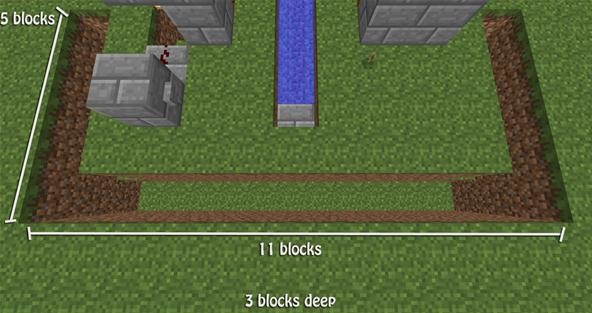
Step 20 Attaching Sides
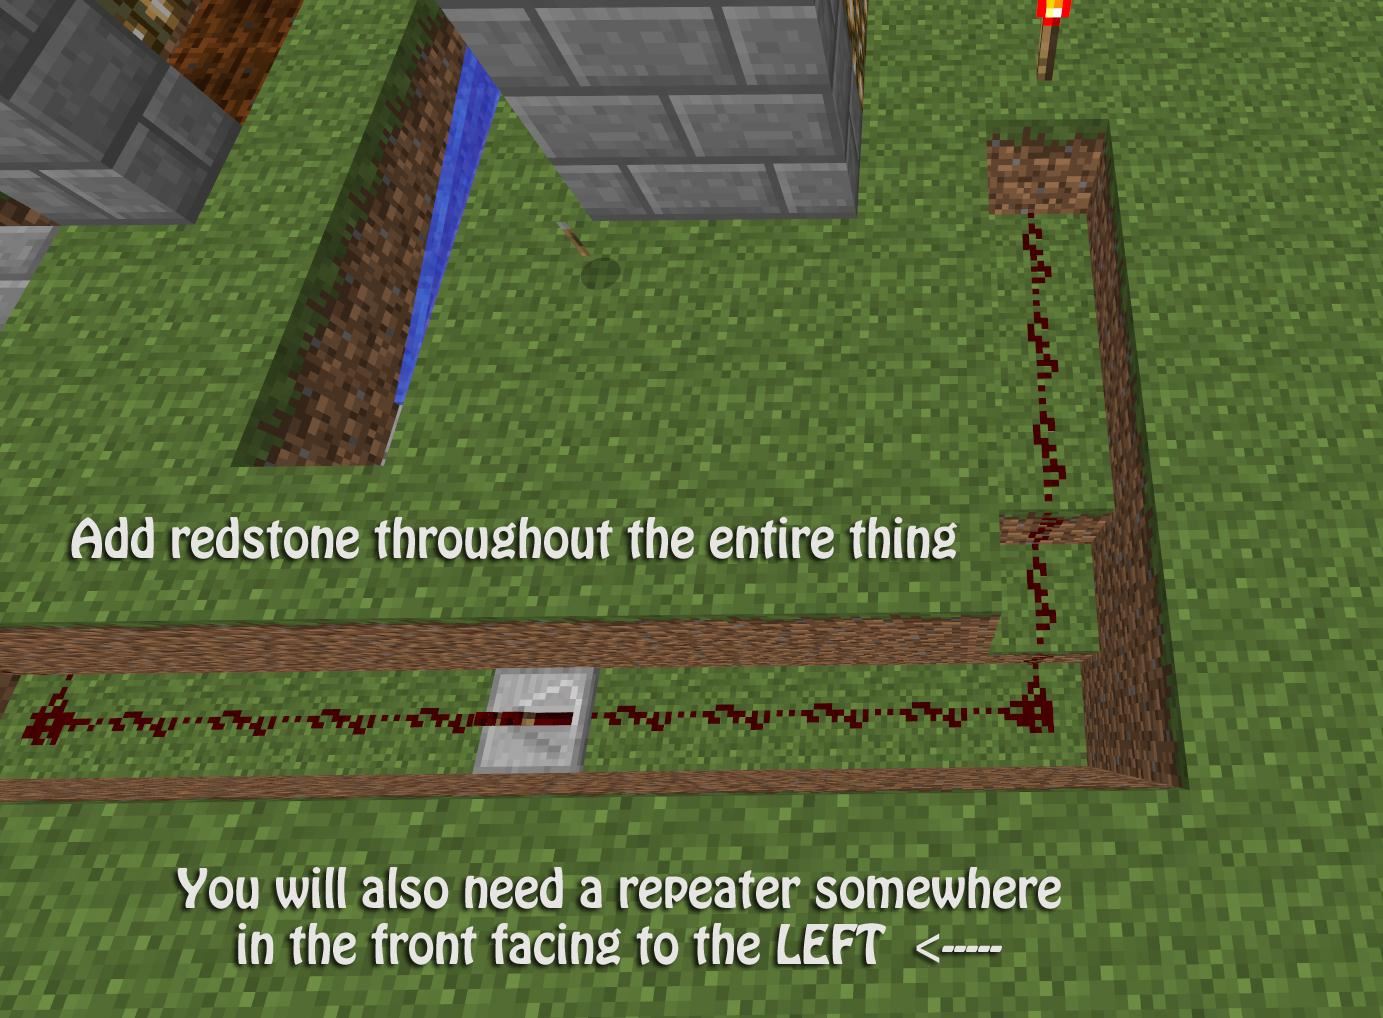
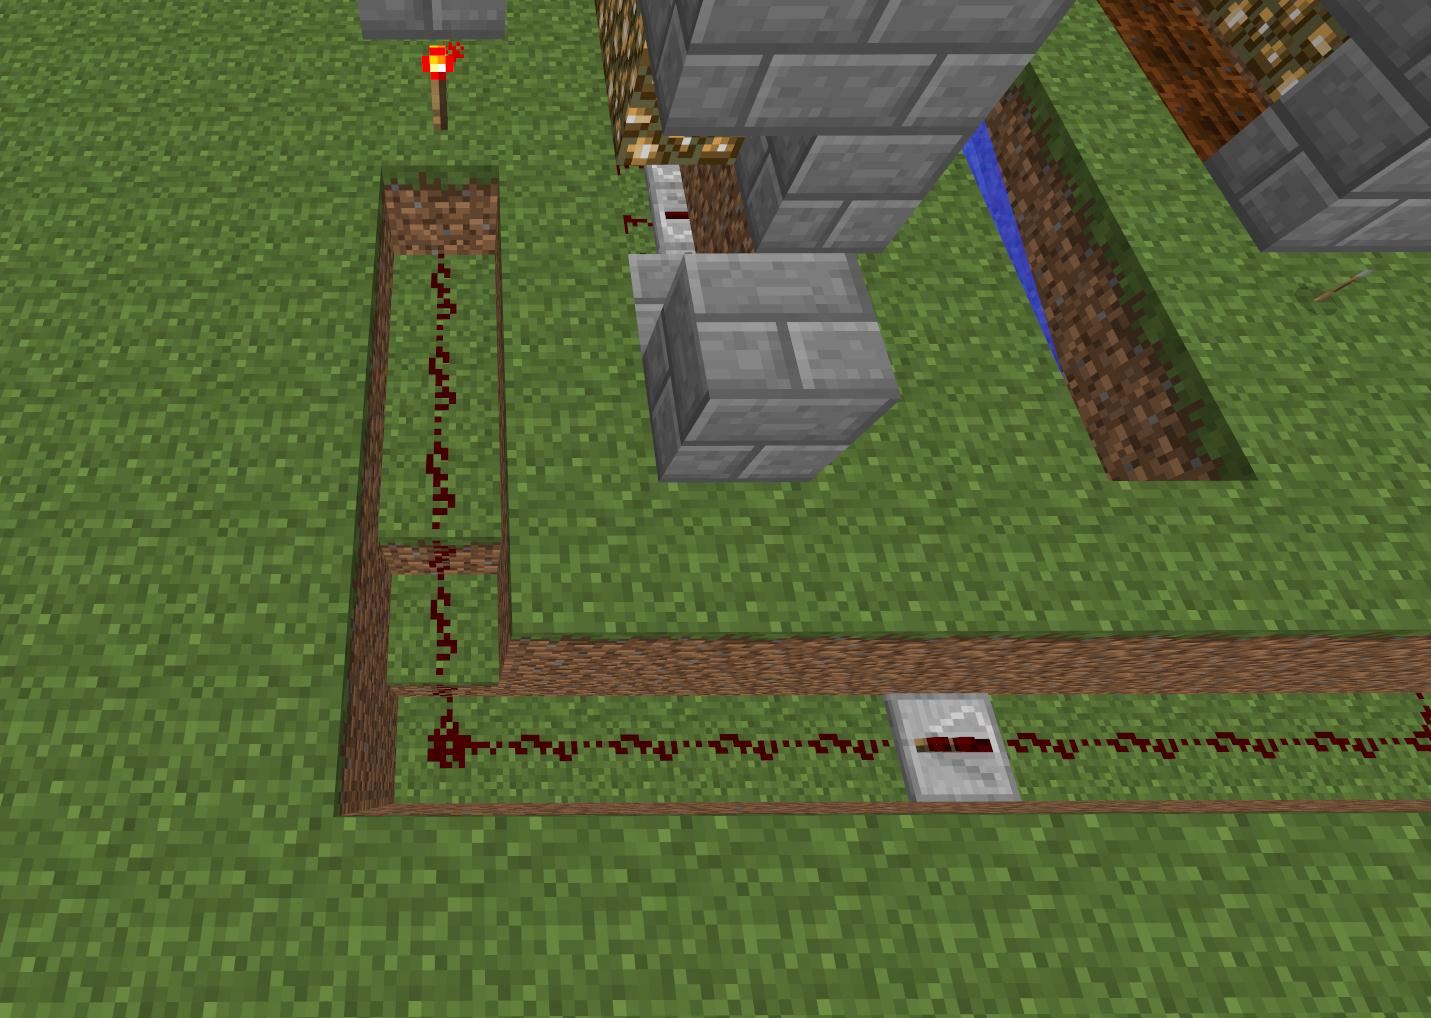
For this step, at the front of your farm, you will need to dig another trench. This will be used to connect the two sides at the top of the farm to a lever at the front. The trench will be 11 blocks long at the front, and the two sides will be 5 blocks long.
It might be easier for you if you start with the sides. Go to the block directly in front of the redstone torch on the ground on each side. Dig straight down so you are 1 block away from the torch. The trench will be 3 blocks deep.
Continue digging a "walkway" of sorts, so each side by the redstone torches is 5 blocks long. Connect the two sides with an 11 block long hole that is also 3 blocks deep.
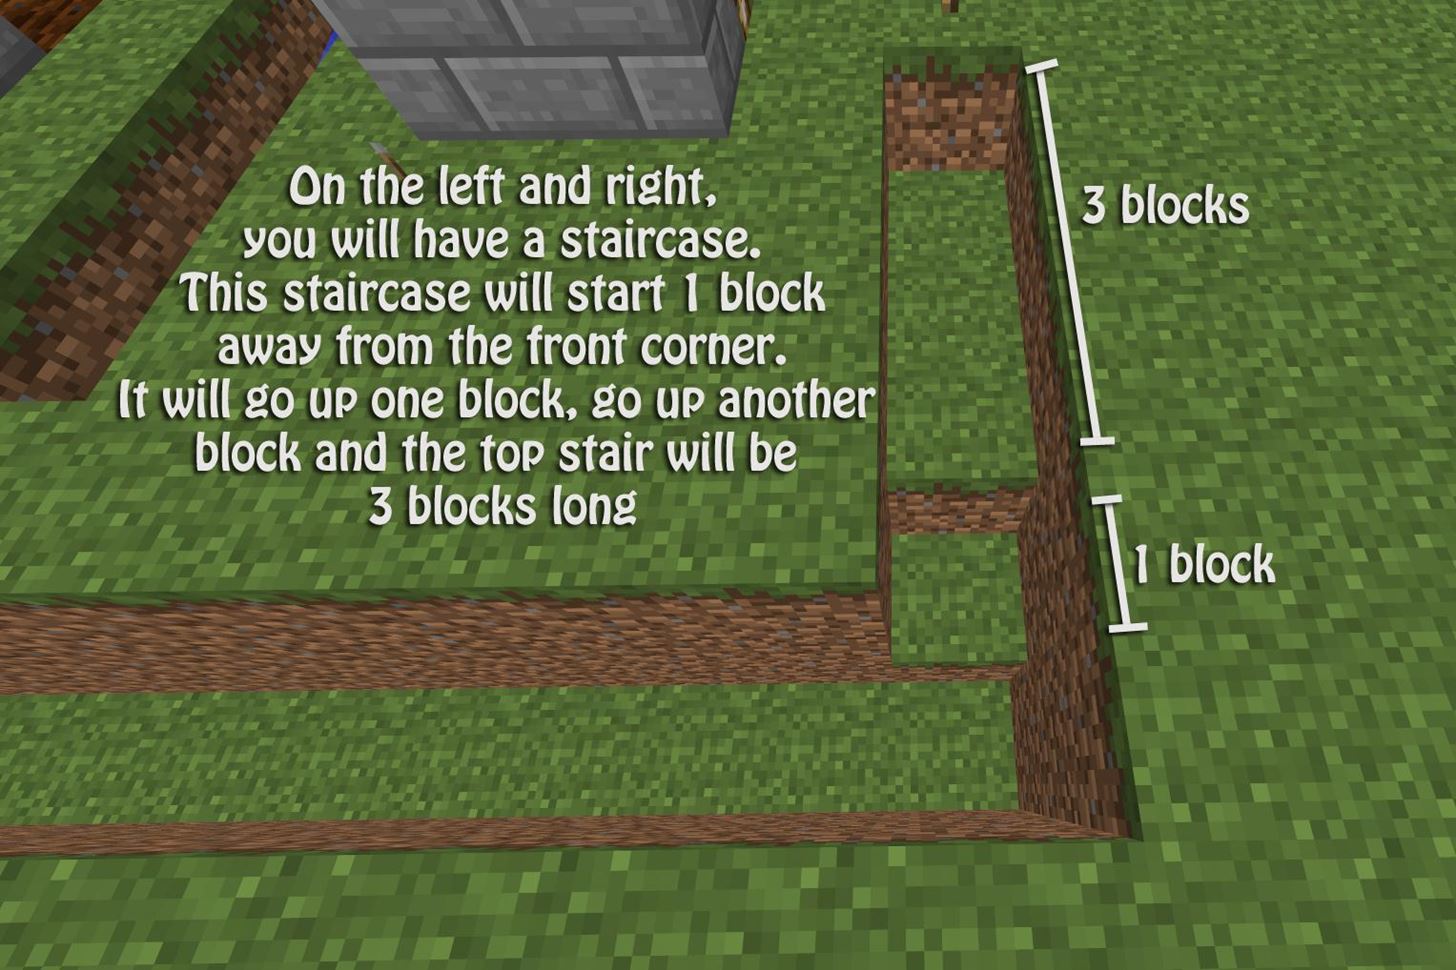
On the left and right, you will need to add a staircase for the redstone. The staircase will start 1 block away from the front corner of your trench. It will go up one block, go up another block and the top stair will be 3 blocks long.
Step 21 Last of the Redstone
Add redstone throughout the entire trench you just dug out, including the steps. You will also need to add a repeater somewhere in the front facing the left of your farm, since the lever for the top half will be at the right of your farm.
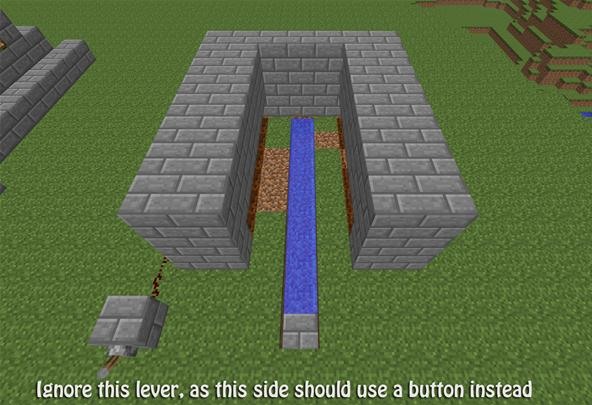
Step 22 Lever Setup
On the right of your farm next to the staircase, add 1 redstone. This redstone dust will be 2 blocks away from the front ledge so it will connect to the redstone that is on the front block on the top stair.
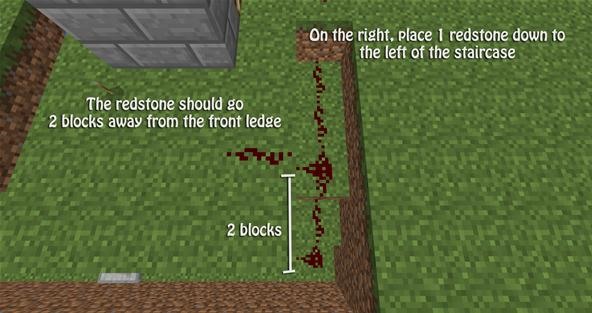
Add a block directly to the left of the redstone you just placed, and stick a lever on the inside. Be sure to test out your lever and make sure the top of your farm works as planned!
When you flip the lever, the pistons at the top will pull inwards, exposing the top of your farm on each side. This is where our water will go in the next step!
Step 23 Water
Add water to the trenches up top.
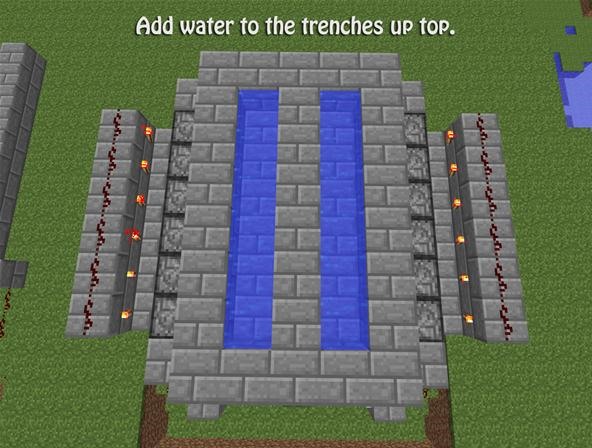
TIP: Do not flip the lever after this step. Because your redstone isn't covered up just yet, the water could break all your redstone!
Step 24 Cover Up
Start adding walls around the inside front of your farm. Your lever and button should be placed the same way mine are, making the cover up process go a lot smoother!
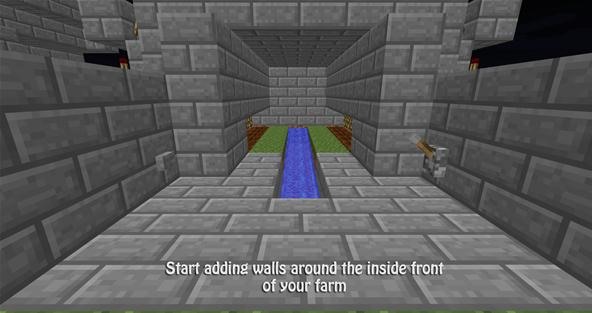
Make sure no redstone is showing through the front!
Step 25 Melon Seeds
Plant your melon seeds alone the back layer directly in front of your glowstone. The land should already be hoed, since we did that in Step 11.
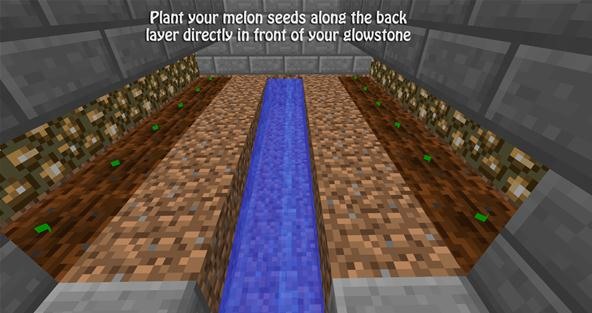
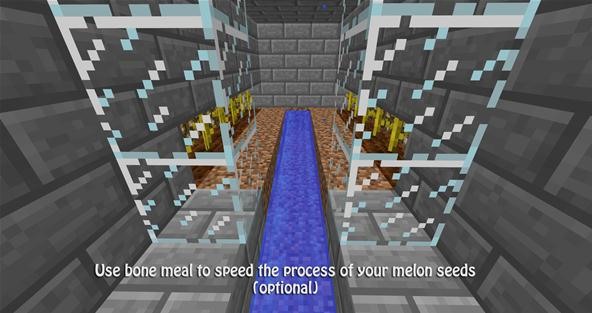
OPTIONAL: Use bone meal to speed up the growing process of your melon seeds like I did!
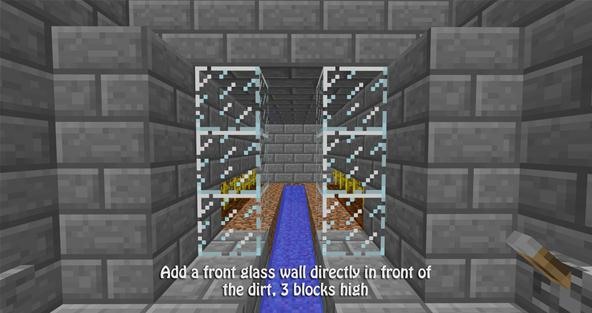
Step 26 Glass Walls
Add a front glass wall directly in front of the dirt. This wall should be 3 high, and the center should be left open so you can enter the farm and leave if needed later on.
Step 27 Glass
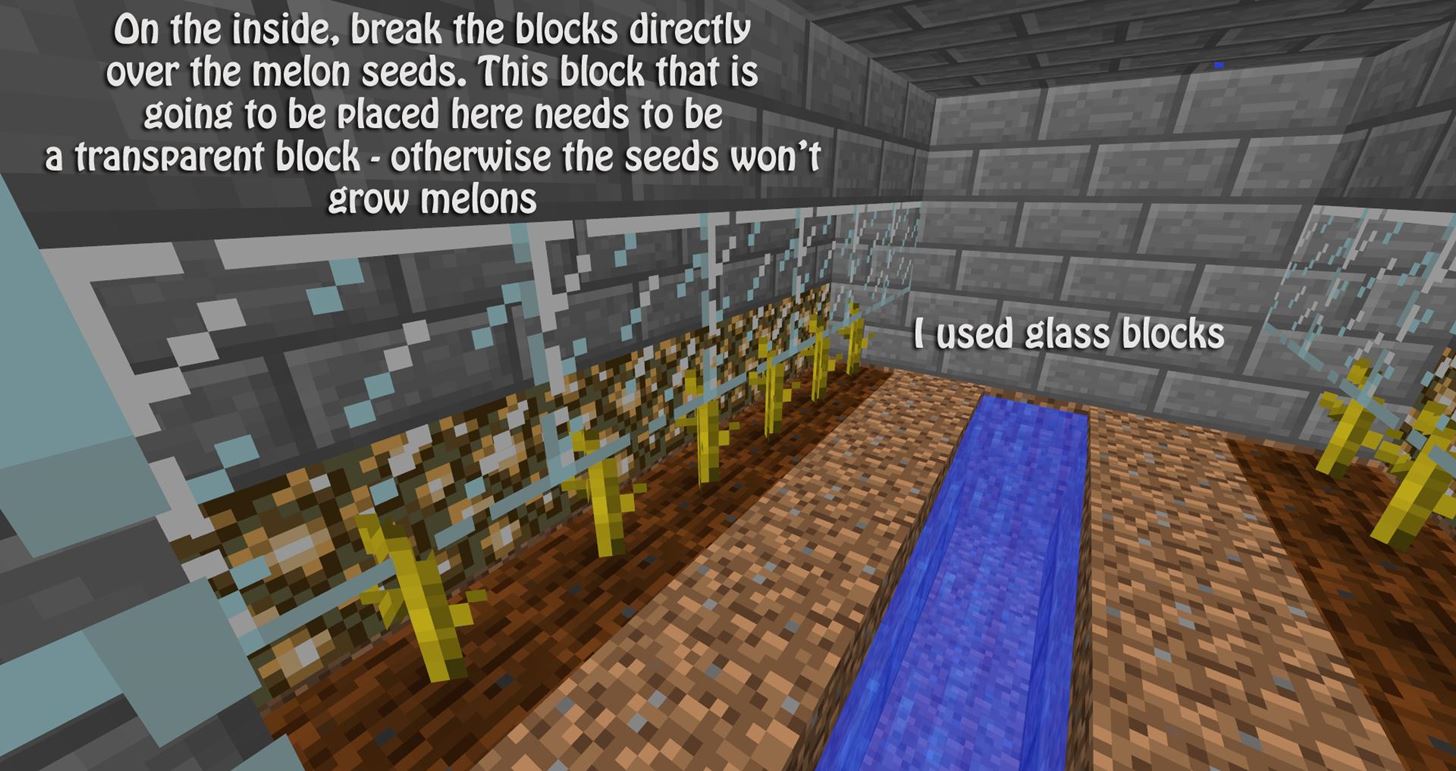
On the inside of your farm, break the blocks that are directly over the melon seeds. These blocks that are going to be placed here need to be a transparent block in order for the melons to grow.
We need this layer above the melon seeds to protect our seeds from the water that will flow from the top of the farm. Without this layer of blocks, our seeds could drown!

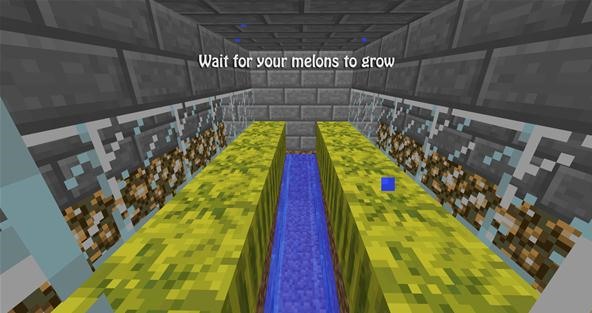
Step 28 Waiting...
Wait for your melons to grow big and strong! Or, if you have melon blocks and want to test the farm out, place those down instead!
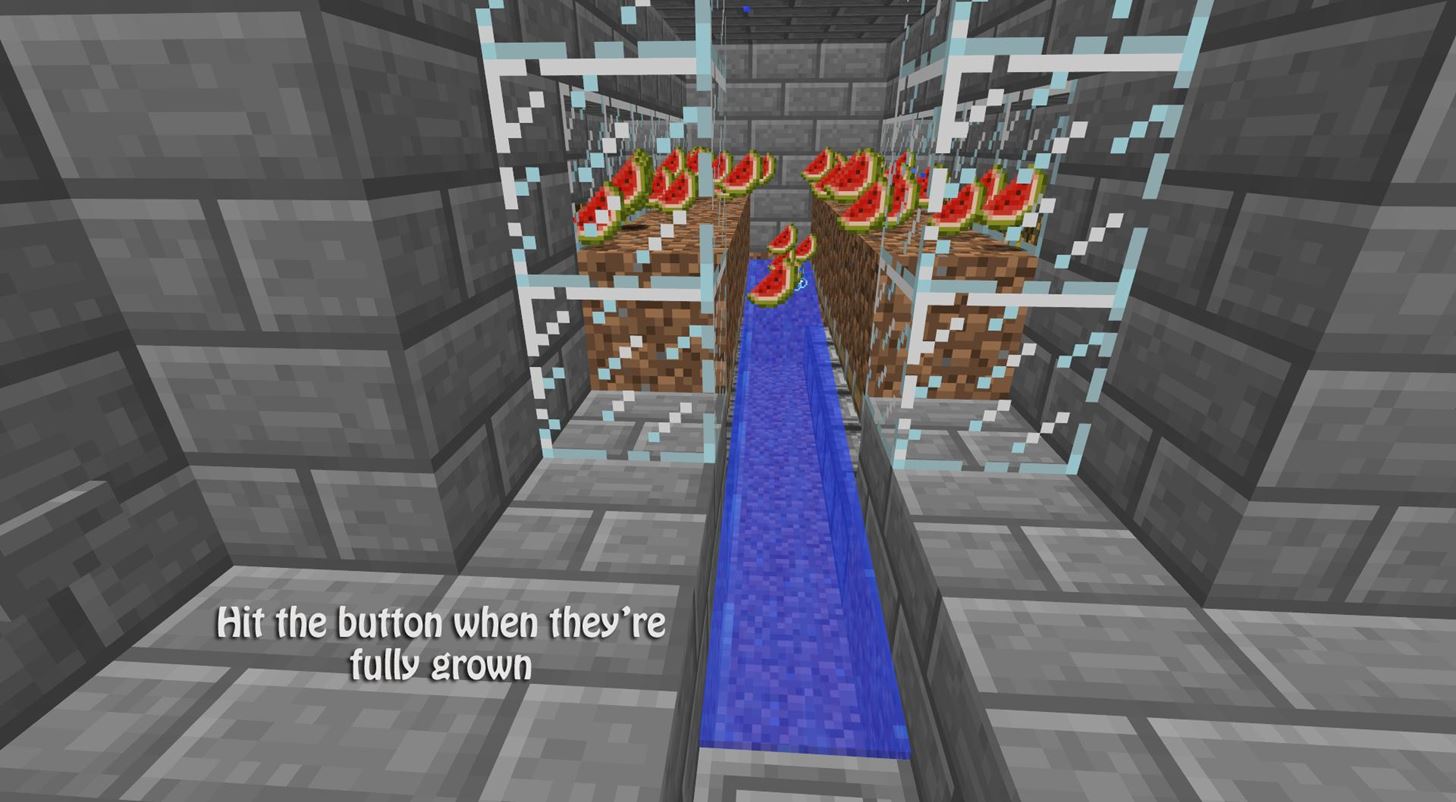
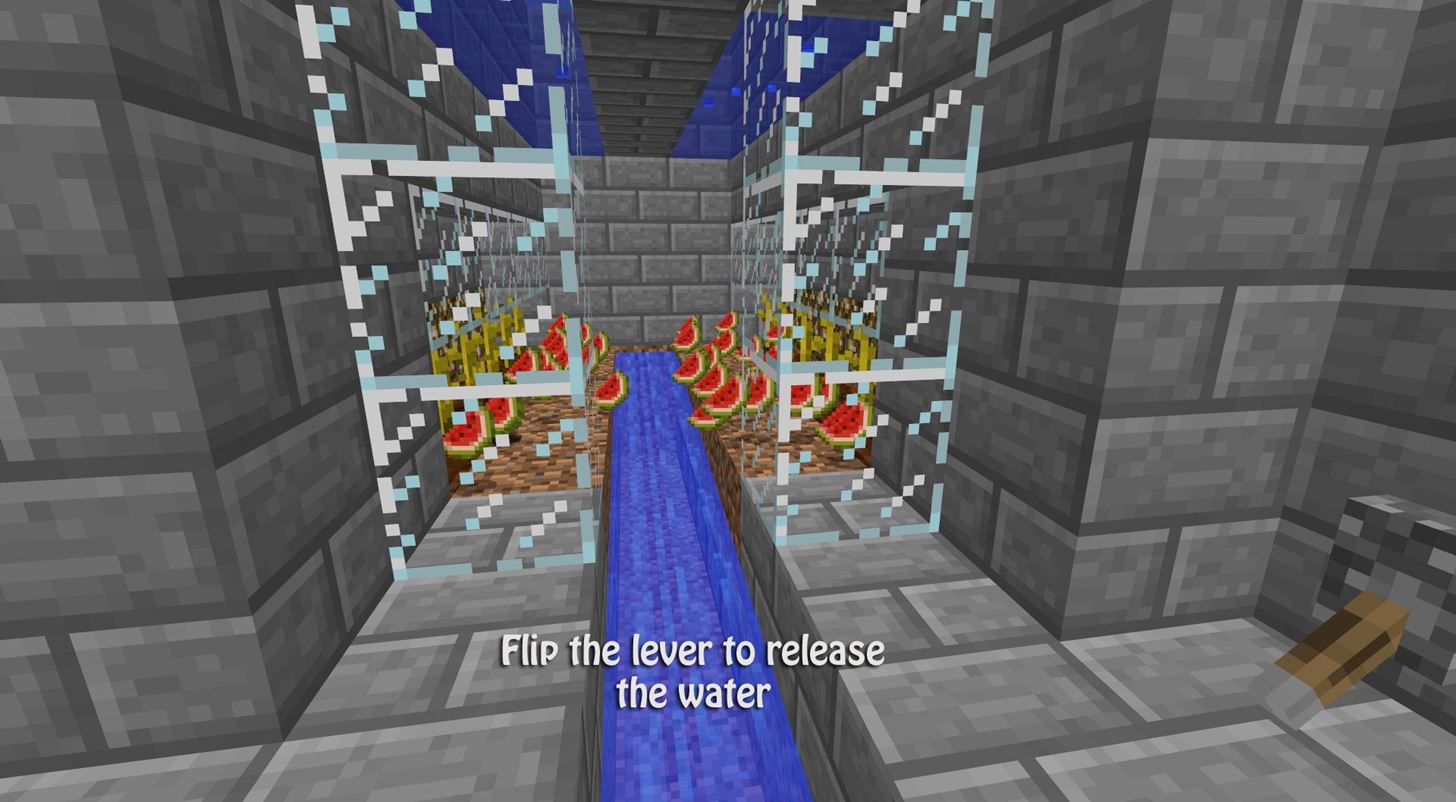
Step 29 Testing
Hit the button on the left front of your farm. The pistons will push up, and break the melon blocks into melon pieces!
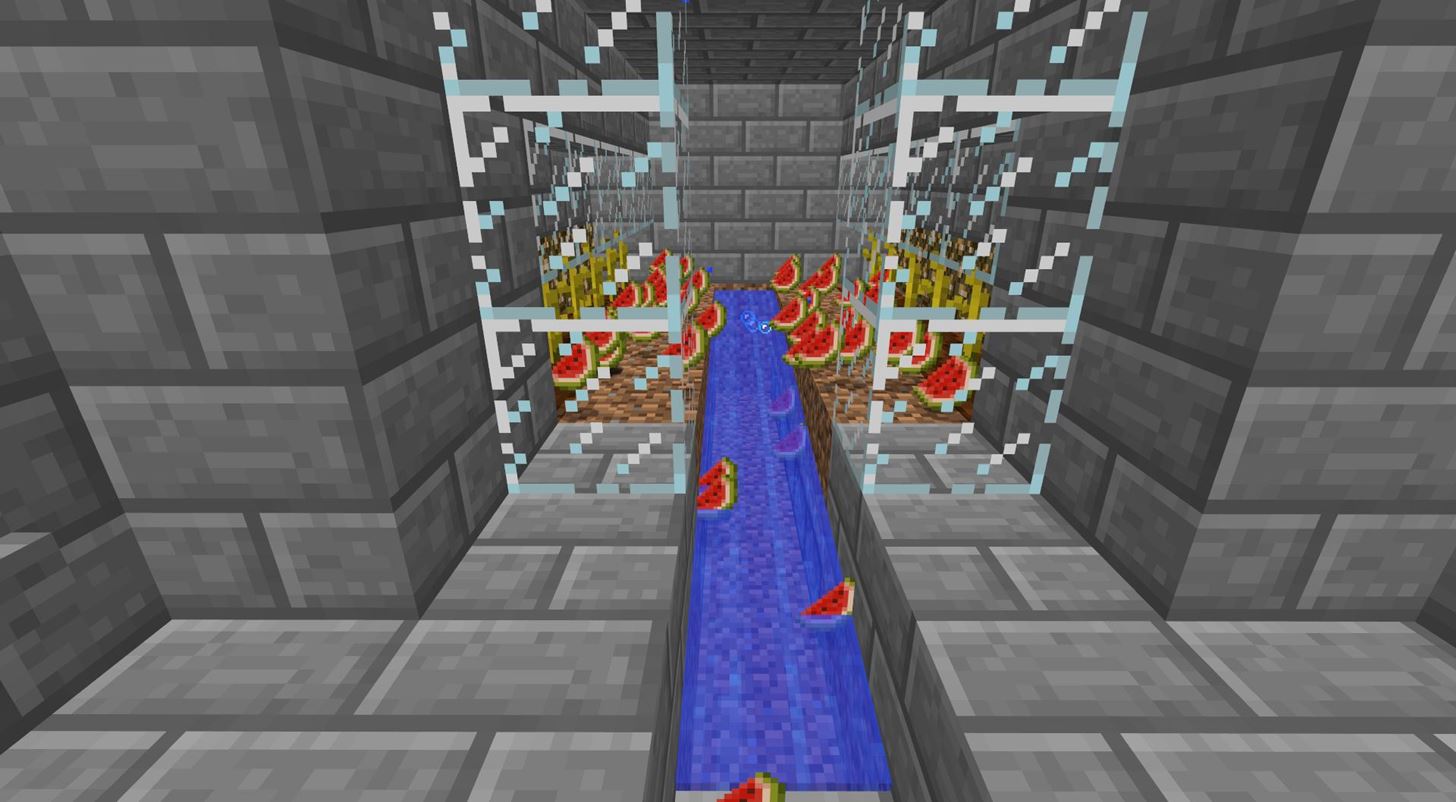
Flip the lever to release the water! The water will start pushing all the melon pieces to the center water stream.
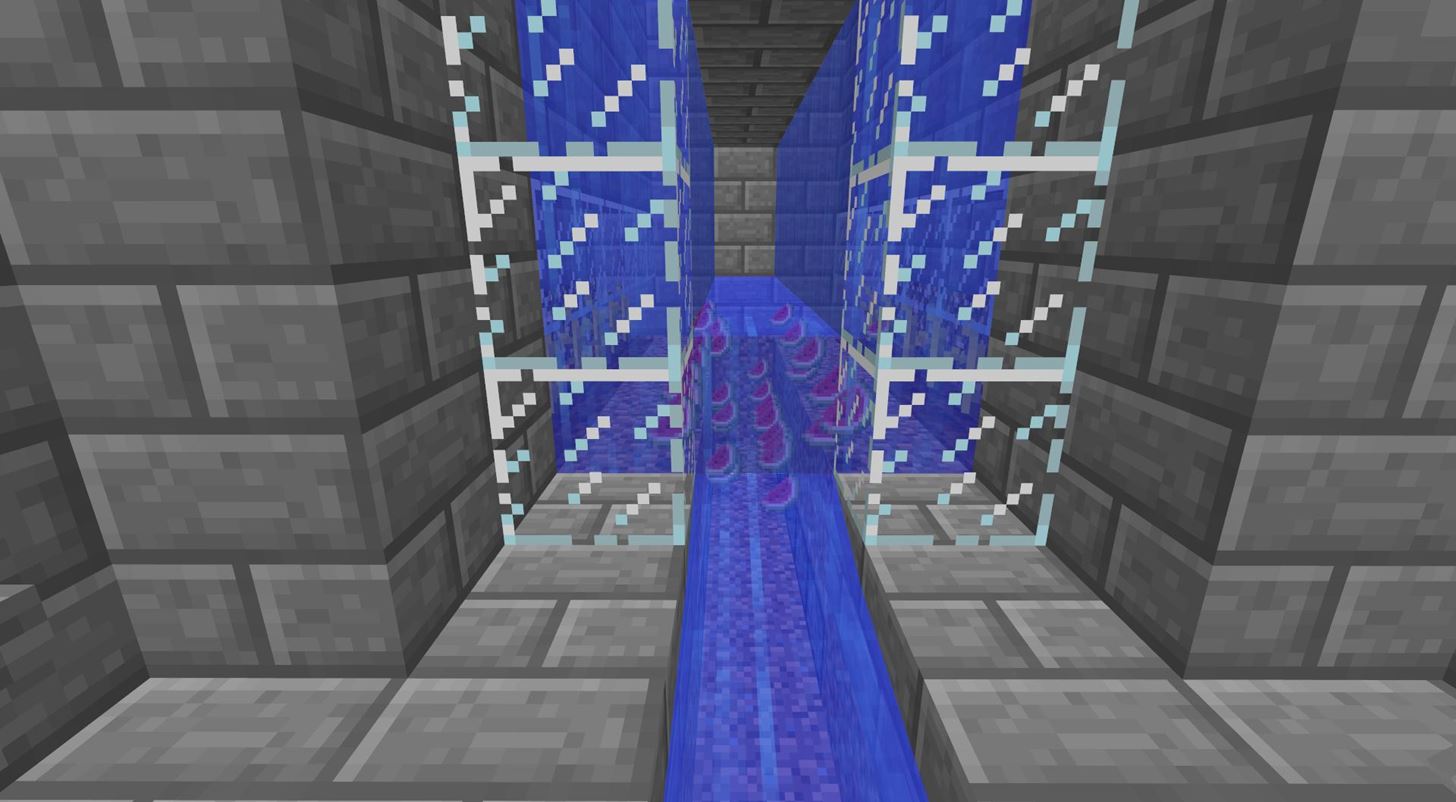
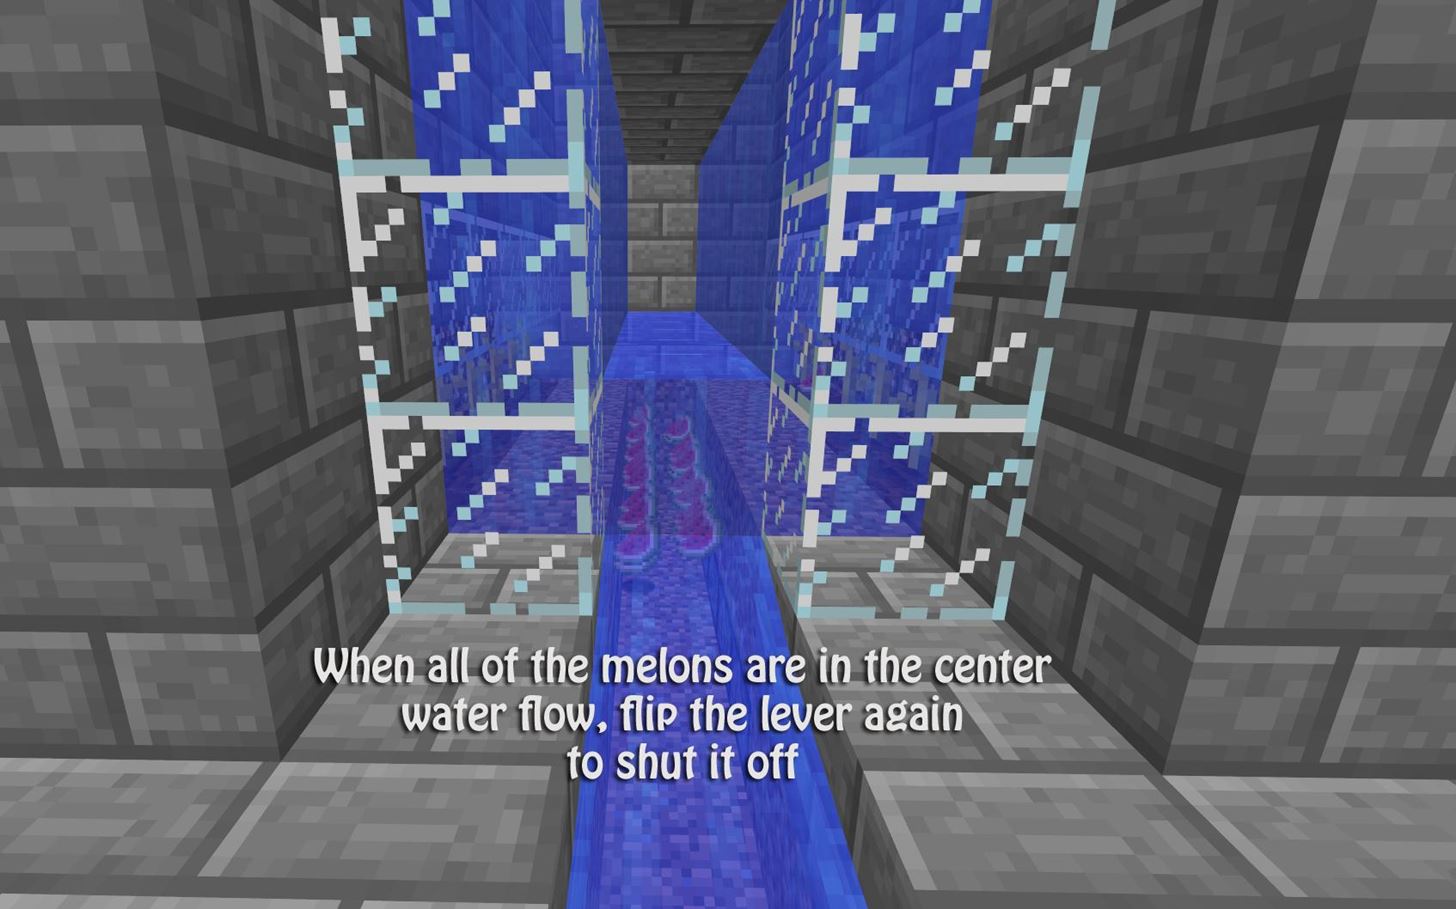
When all of the melons are in the center water flow, flip the lever again to shut it off.
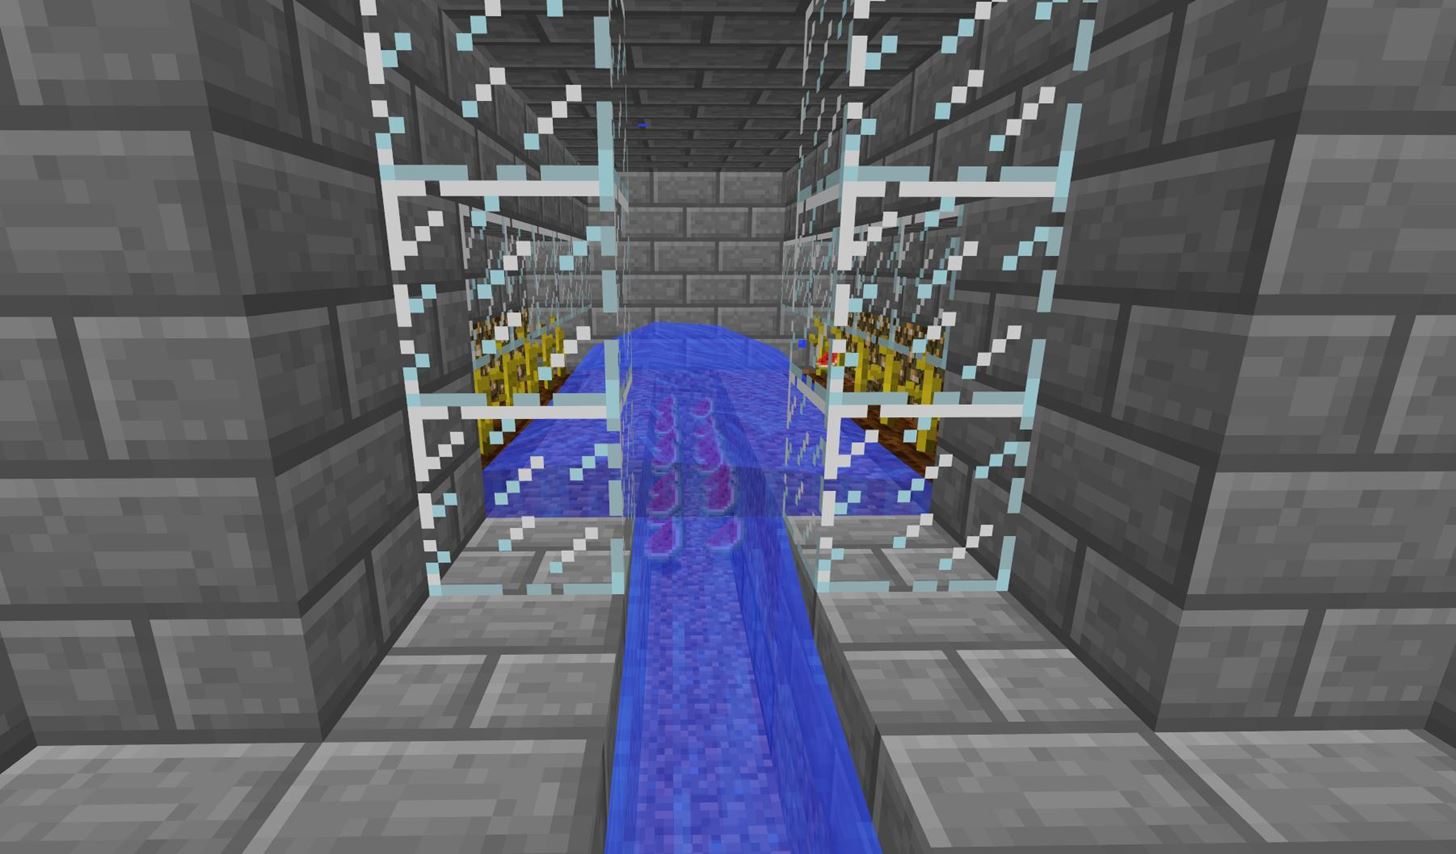
Step 30 Collection!
Collect all of your melons!

Questions for the Audience:
- Have you ever made a similar melon farm?
- Did you enjoy and learn something from this tutorial?
- Would you be interested in a completely automatic melon farm?
- What kind of tutorials would you like to see in the future?
I would love to hear a few words from the audience, so please... don't be shy!
Follow us on Twitter @MinecraftHowTo!
Just updated your iPhone? You'll find new emoji, enhanced security, podcast transcripts, Apple Cash virtual numbers, and other useful features. There are even new additions hidden within Safari. Find out what's new and changed on your iPhone with the iOS 17.4 update.


15 Comments
is it possible to use like a 10-15 minute timer for the melons so that they are automatically harvested?
The version I'm going to do next week is a fully automatic farm using a BUD switch, so I'm sure you'll like that version!
I've never made anything over a 5 minute timer, is it possible?
Yeah it is and surprisingly not overly difficult to do! I'll make a tutorial with enough interest.
Nevermind, I made one anyway :P https://steveohs-redstone.wonderhowto.com/blog/make-simple-tileable-timer-minecraft-0135645/
Yes, you use a bud switch with a t flip flop. or a dispenser with a t flip flop or Multiple t flip flops. Using Item decay code a bud switch can activate a dispeser that tosses out an item onto a pressure plate that ativates a t flip flop. the out put of the t flip is only activated every 10 minutes. You add another t flip flop to the out put of the first and it takes twice as long ect.
great guide ty, I made 1 small change I moved the bottom water source back 1 block it seems to stop the back two melon bits getting stuck . thanks for a fun build keep up the good work :D
Clever idea! Glad the tutorial inspired you!
I'm gonna try something with a sensor that turns on when the melon appears, not a BUD, but a thing that makes some redstone complete when the melon is there.
I had a lengthy post here on an alternative to glowstone and how to get mossy stone without finding a stronghold. why has it disappeared? I put a lot of effort into that!
I have absolutely no idea, Jason! That sounds awful, though. =(
Would you like to e-mail the main site administrator? It's possible that he can either find it for you, or find out what happened to it!
If so, just let me know and I'll put you in touch with him!
Thanks but after building this guides model and looking over it for a while, I started to come up with quite a few modifications and additions. I'm going to put together another guide for it.
Jason, I mentioned your situation to the main admin, and he says there's no record of a post from you on the site. Were you in the process of writing it when something happened? If so, the problem was mostly likely on the side of your browser.
Sorry about that! =(
only the left side of it is rising :( any suggestions?
Alex it could be a break in the Redstone or the Redstone repeater could be on the wrong setting or facing the wrong direction. Try checking all these because because I had the same problem with a larger almost to large pumpkin version I created.
Thank you so much! i just built this and it works perfectly!
Share Your Thoughts