

Firstly, let me say a few quick things:
- Once built, this is a lazy (one button) way to harvest melons, but this is going to be a complex and lengthy build.
- This is a skeletal build, so covering things like the wiring is at your own discretion.
- Some materials can be replaced by the blocks of your choice, but not the glass blocks.
- For this tutorial, I use stone brick, but you can use any block of your choice to replace it other than glass, sand or gravel.
Preparation 1: Gather Materials
Going back for more stuff during a build is a pain, so before you start this build, you're going to need the following:
• 103 blocks of your choice
• 93 redstone repeaters (I couldn't believe it when I counted that)
• 74 redstone (dust)
• 21 sticky pistons
• 20 dirt blocks
• 16 redstone torches
• 10 torches or glowstone blocks
• 10 glass blocks
• 10 seeds
• 3 buckets of water
• 1 slab (any kind)
• 1 hoe or 10 melon blocks
Now that you have that insane amount of materials, you need a space to build it.
Preparation 2: Pick a Spot and Clear It
If you play in survival mode like me, pick a spot that's well lit (make more torches) and hard for mobs to reach. Nothings worse than getting halfway through a build and getting a sudden creeper explosion!
You're going to need a space 11 blocks wide, 25 blocks long, 8 blocks tall (able to dig down 3 blocks and buildup 5 blocks).
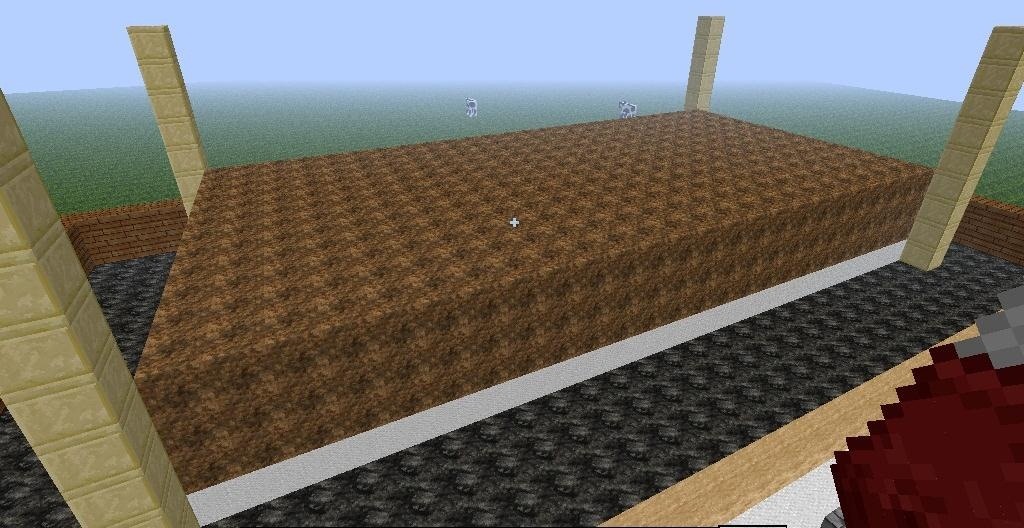
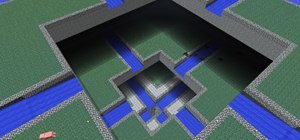
I know that seems a bit much, but trust me, I did try to make it compact, and most of it will be hidden underground. (Unless you're like me and made a glass floor to appreciate the work XD)
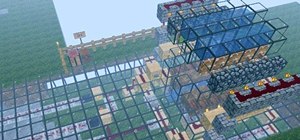
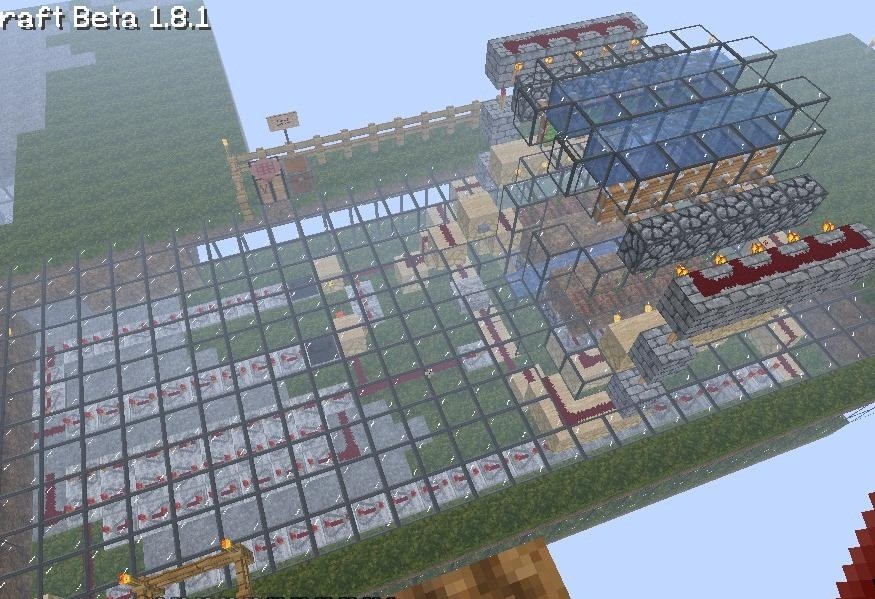
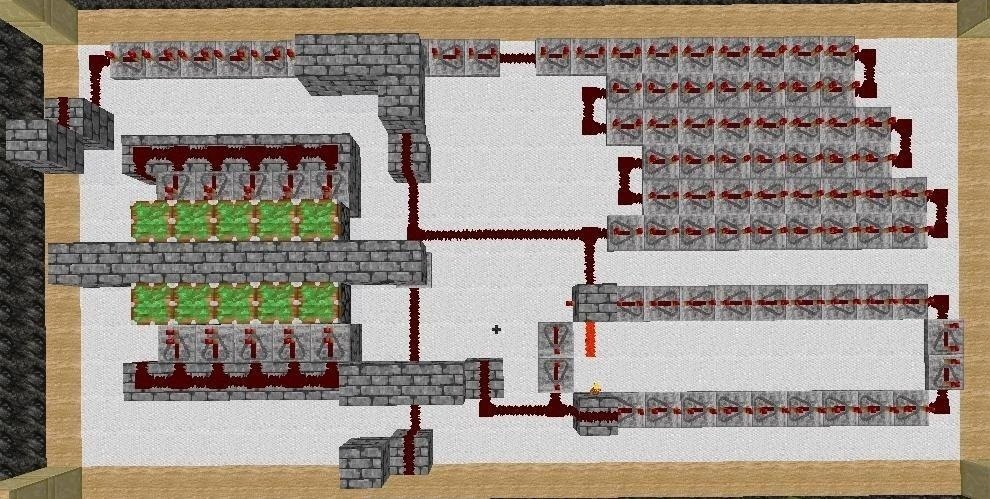
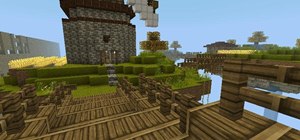
Here's a screenshot of the completed skeleton build replacing as much as possible with glass.
A Word of Caution Before Beginning!
Use caution when placing and working around repeaters! It's obvious that large amounts of them can cause lag, but it can also cause glitching. I fell through repeaters and the ground around them to my death several times! It was pure dumb luck that I built on a plateau sticking off the side of a cliff with a very thin layer of ground, so I could at least recover my items on the ground far below.
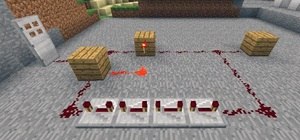
Layer 1 - Extensive Wiring
The bottom layer requires 28 stone bricks, redstone dust, repeaters, and torches.
Take note of the active redstone dust in the image. That MUST be placed last! Unless you want your circuit to repeat forever and lag you like crazy.
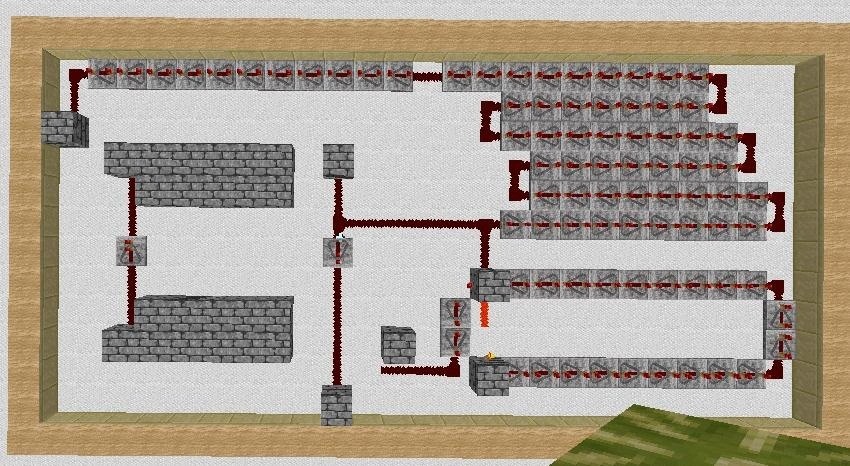
On this layer, you should also notice all but 2 of the repeaters (the ones sitting by themselves) have been set to max delay (right-click to change them); this ensures the timing of the automated stages.
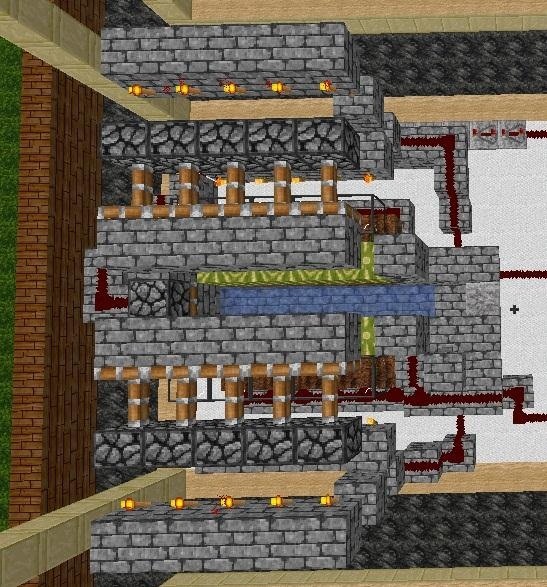
Layer 2 - Add Some Pistons
From the pictures below; this layer needs 17 placements of redstone dust, 10 repeaters, 10 sticky pistons, and 18 stone bricks.
These pistons dislodge your crops from the ground.
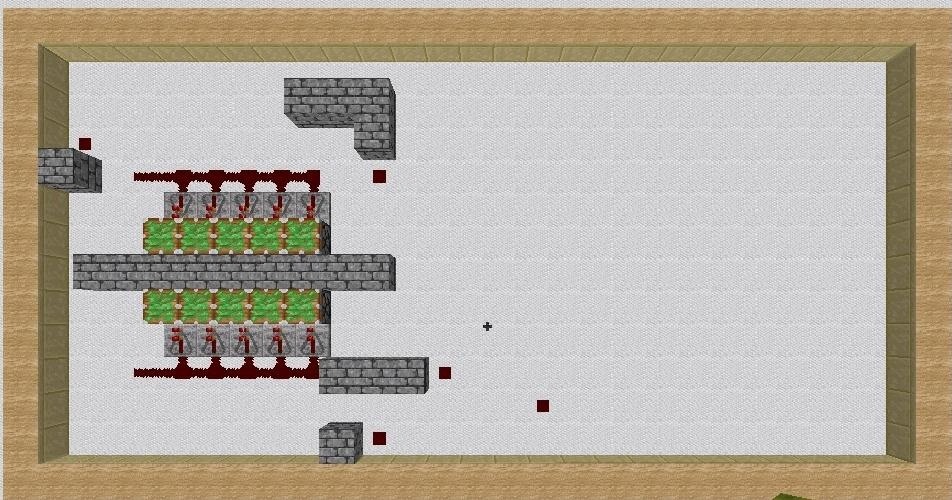
From this point on, all images will only show the left half of the built area. This is because there is nothing more to do on the right side and it makes images smaller and less to load.
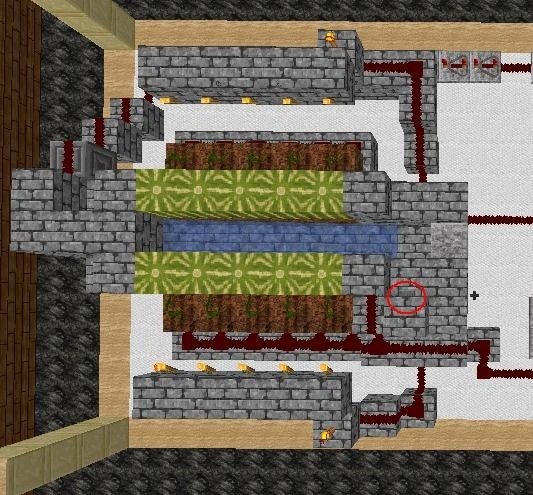
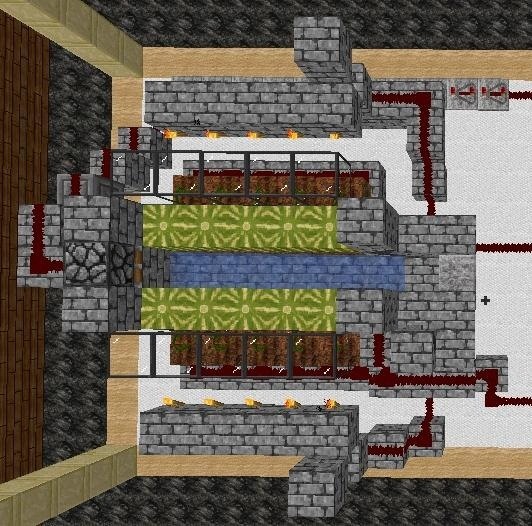
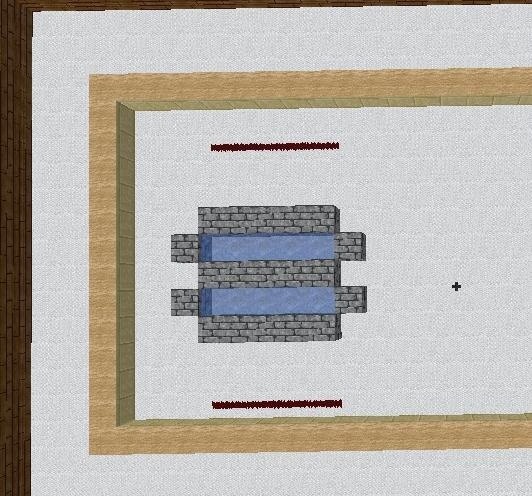
Layer 3 - Add the Water Last!
This layer requires placement of 8 redstone dust, 14 stone bricks, 1 slab of any material, 10 dirt blocks, and 1 water placement.
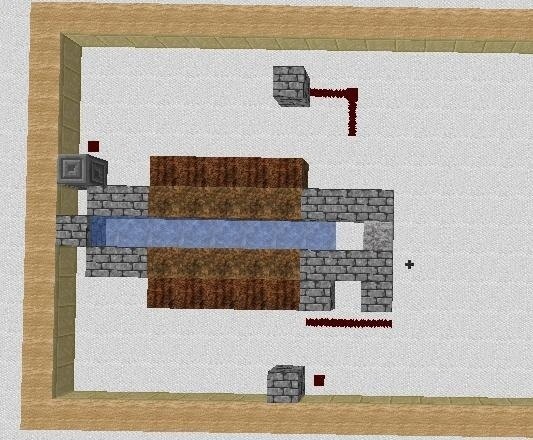
You'll notice 1 chiseled block. That should have been a stone brick >.<
The slab is merely to make an easy stairway to your collection area and can be replaced with actual stairs.
Don't forget, the water must be placed last; any run-off will wipe out your redstone on the ground below.
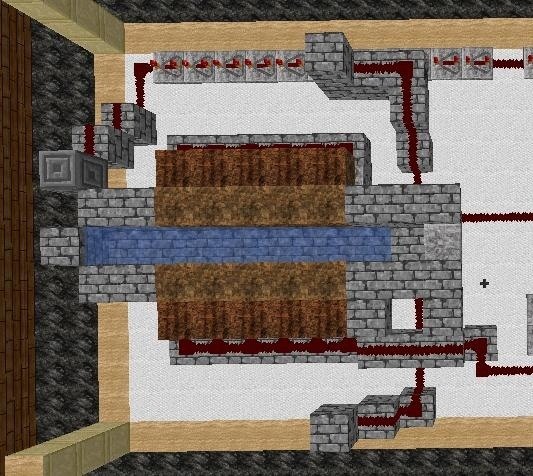
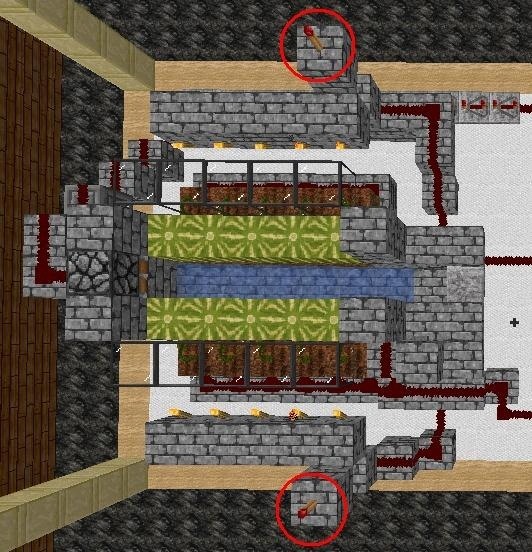
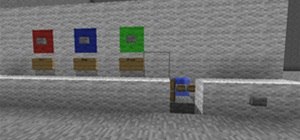
Layer 4 - Time to Plant
This layer requires placement of 19 stone bricks, 10 torches, 2 redstone dust, 2 redstone torches, and 1 button.
The redstone torches will be facing straight up, attached to the blocks below them. Add your button to the side of the stone brick, circled in the pictures below. (Thank you to Bravo Lee for pointing out that I forgot to add the button XD)
The regular torches must be placed on the sides of the outer lines of stone bricks. 10 is more efficient, but I have found crops will grow with as little as 4.
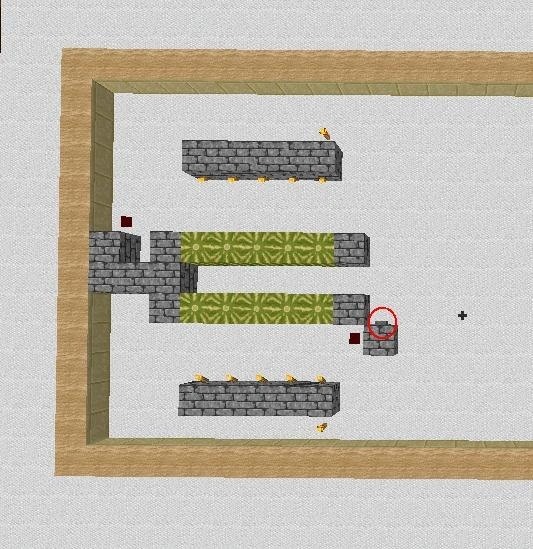
At this point, you can hoe the dirt blocks, plant seeds on the lines of dirt 2 blocks away from the water, and wait for them to grow while you build or place melon blocks along the water edge.
You can replace the torches with glowstone, but make sure you do not place it over the redstone wiring or it may cut off the signal.
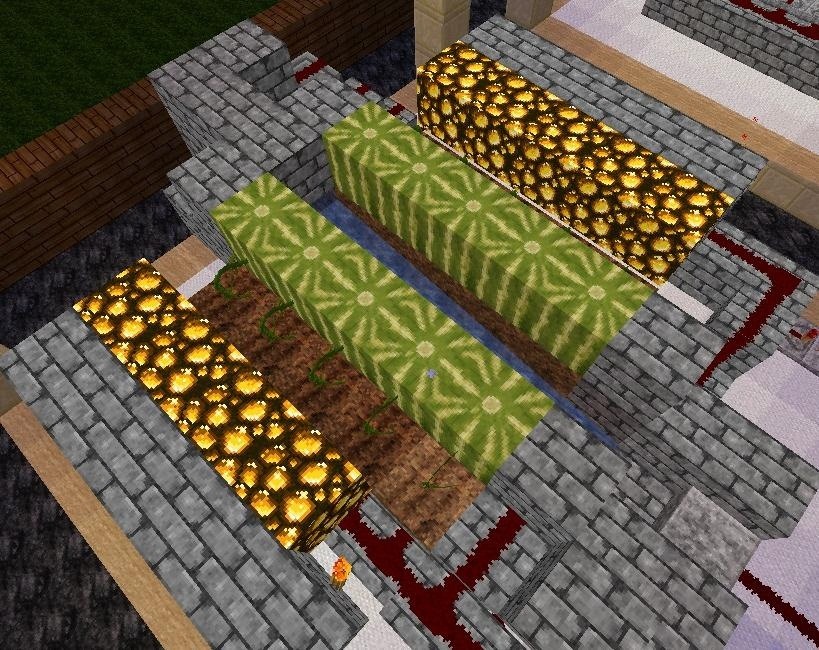
Layer 5 - Glass and Spillway Shut-Off
This layer requires placement of 1 sticky piston (facing down), 6 stone bricks, 10 glass blocks, and 3 redstone dust.
The glass allows your crops to grow, they will not grow with anything else above them and you cannot leave that area open to water.
I realized as I was typing this up how much of a pain placing that piston will be now, sorry for that.
I realized as I was typing this up how much of a pain placing that piston will be now, sorry for that.
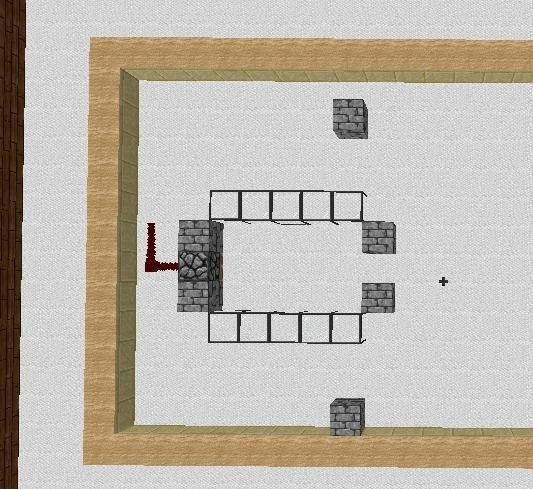
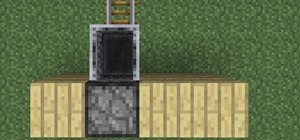
Layer 6 - Easy as It Gets
This layer only needs 2 redstone torches placed on top of stone bricks.
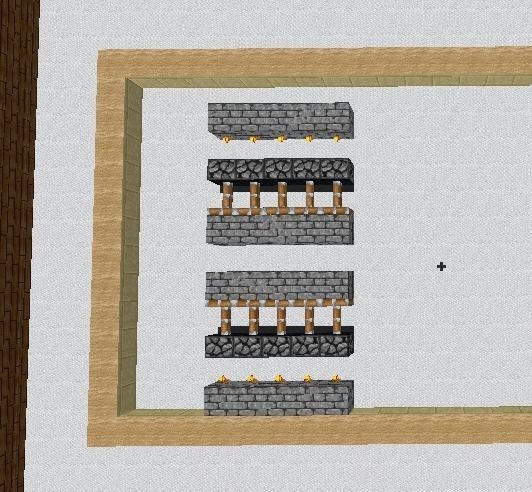
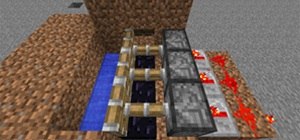
Layer 7 - Floodgate Pistons
This layer requires placement of 10 sticky pistons, 10 redstone torches, and 20 stone bricks.
This layer controls the water that floods over the farm, pushing uprooted crops into the spillway.
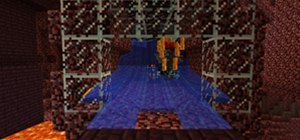
Layer 8 - Floodwater
This layer requires placement of 10 redstone dust, 19 stone bricks, and 2-10 water (1 water in the center of each trench or fill it).
This is the final layer; it holds the floodwater and connects the floodwater pistons.

Your Fully-Automated Farm Is Complete!
If successfully rebuilt, the full cycle should take roughly 41 seconds to complete. The last part of the cycle giving you nearly 9 seconds to get some quick tilling in before the spillway opens again. It could be made longer, but that would increase the waiting time for it to shut off the water.
I hope you like the redesign and didn't find the layer-based tutorial too confusing or irritating. That said, any constructive criticism or ideas for changes are welcome. (Wiring improvements also appreciated XD)
Want a Timer to Start the Farm Itself?
This setup can also include an automated timer. I found a very useful timer setup on this site shared by Steve.
Can'T Forget to Give Credit Where Credit Is Due!
The texture pack I use is called the "Mixcraft HD texture pack" and can be found here.
The original design that I built onto was shared on this site by Kendra W.
And I would have been lost without the redstone delayer video posted on YouTube by lindell92.
The program used to duplicate layers of build was MCedit. You can find many versions here.
UPDATE: A big thank you everyone for 21 Kudos in 3 days!
Please make sure to visit the link above to the original design and give Kendra W a Kudos for the original inspiration.
Just updated your iPhone? You'll find new emoji, enhanced security, podcast transcripts, Apple Cash virtual numbers, and other useful features. There are even new additions hidden within Safari. Find out what's new and changed on your iPhone with the iOS 17.4 update.


9 Comments
Wow, what an intense how-to! Great job! =)
thanks :) my computers a little old to record the screen while running Minecraft so I figured the layer steps would be as easy to follow as the old Lego set instructions lol.
ummm i built the thing as the pictures say, but none of the redstone is activating pleas help
There could probably be any number of reasons for that, Bravo. It could even be as simple as one missing torch, or one repeater at the wrong delay setting. Maybe Jason can help you. =)
Sometmes it's lag. (Even though in this case it's not)
I have tests for that. Test 1. put a torch on a block and destroy the block. How long does the torch stay in the air? Test 2. Redstone. Power redstone with a lever. See how long it takes to turn on and off. (Delay between it doing something and you telling it to)
and finally the simple chest/crafting table/ anything that can be opened. Just see how long a break between opening command and when you see the interface. =)
lol I forgot to add the instruction to layer 4 about adding the button to start it XD
Text and pictures updated, sorry for the confusion.
Way to over-complicate things. A simple hopper timer & pulse limiter to activate it once every few minutes along with a row of sticky pistons and slime to knock those melons (or pumpkins or sugar cane) off in to a water stream leading to a hopper is much simpler, much much cheaper, more effective and easier to build.
Well Rich; I would have made a simpler design with suggestions such as those. Unfortunately, I couldn't travel into the future to obtain those blocks.
You may notice this was made in 2012, when those options didn't exist.
Share Your Thoughts